PC Services
- Former user (Deleted)
- WES Admin
The code in this user manual was tested on a PC. It was convenient to create a number of services (i.e., functions) to access some of the capabilities of a PC. These services are invoked from the test code and are encapsulated in a file called PC.C. Since industrial PCs are so popular as embedded system platforms the functions provided in this chapter could be of some use to you. These services assume that you are running under DOS or a DOS box under Windows 95/98/NT or 2000. You should note that under these environments, you have an emulated DOS and not an actual one (i.e., a Virtual x86 session). The behavior of some functions may be altered because of this.
The files PC.C and PC.H are found in the \SOFTWARE\BLOCKS\PC\BC45 directory. These functions encapsulate services that are available on a PC. This allows you to easily adapt the code to a different compiler. PC.C basically contains three types of services: character based display, elapsed time measurement and, miscellaneous. All functions start with the prefix PC_.
Character Based Display
PC.C provides services to display ASCII (and special) characters on a PC’s VGA display. In normal mode (i.e., character mode), a PC’s display can hold up to 2000 characters organized as 25 rows (i.e., Y) by 80 columns (i.e., X) as shown in figure 20-1. Please disregard the aspect ratio of the figure. The actual aspect ratio of a monitor is generally 4 x 3. Video memory on a PC is memory mapped and, on a VGA monitor, video memory starts at absolute memory location 0x000B8000 (or using a segment:offset notation, B800:0000).
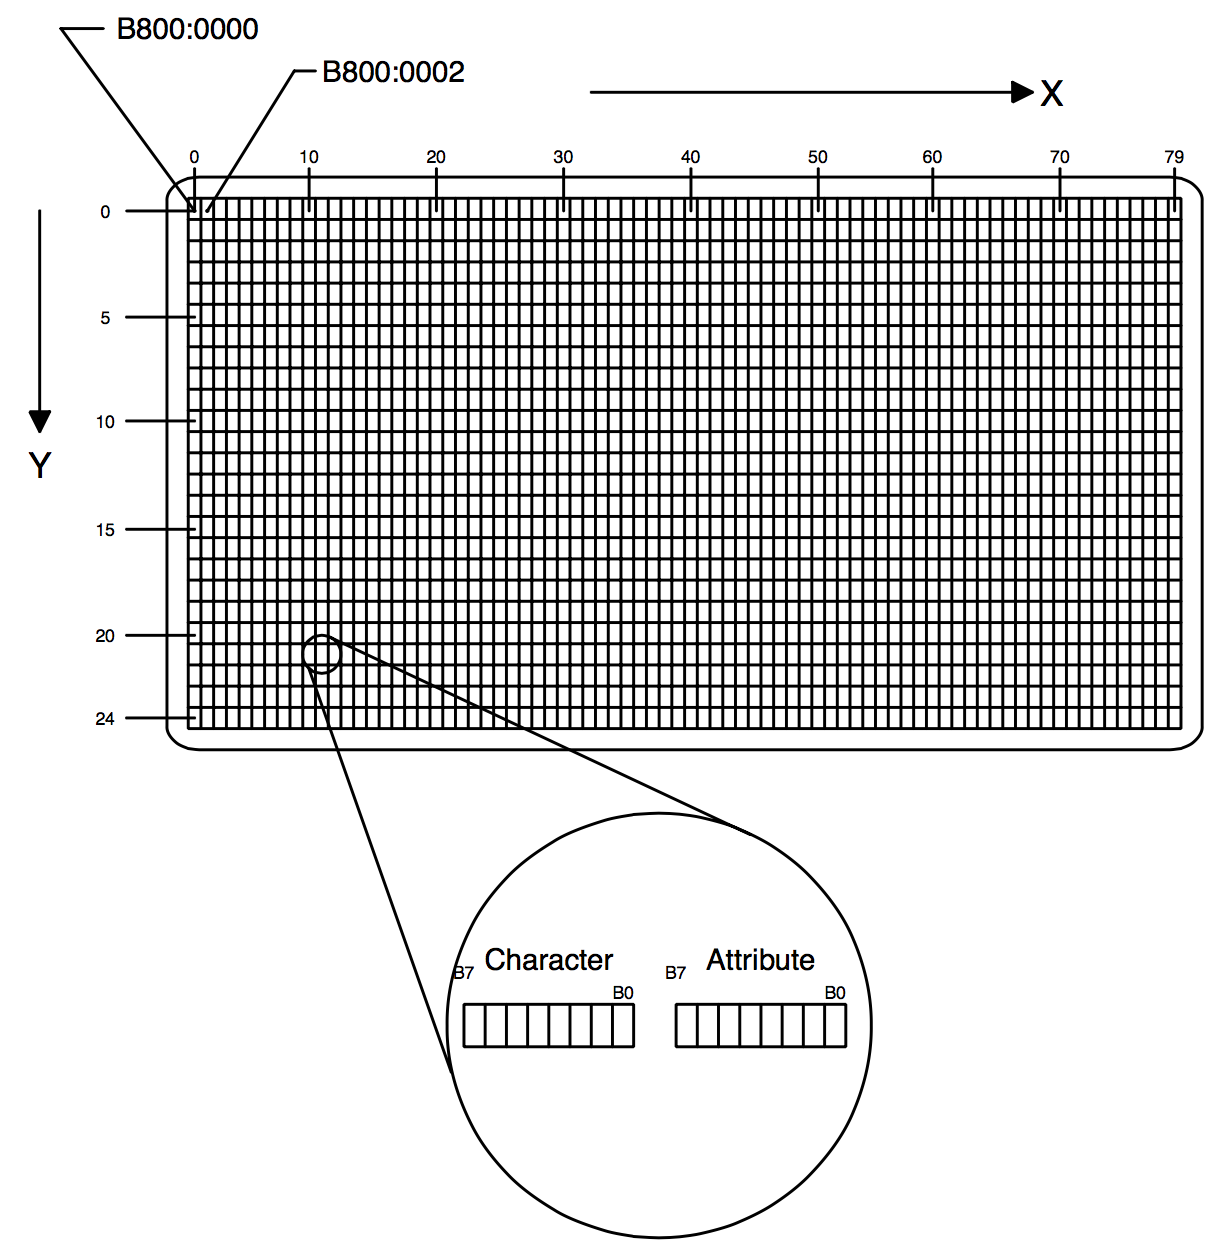
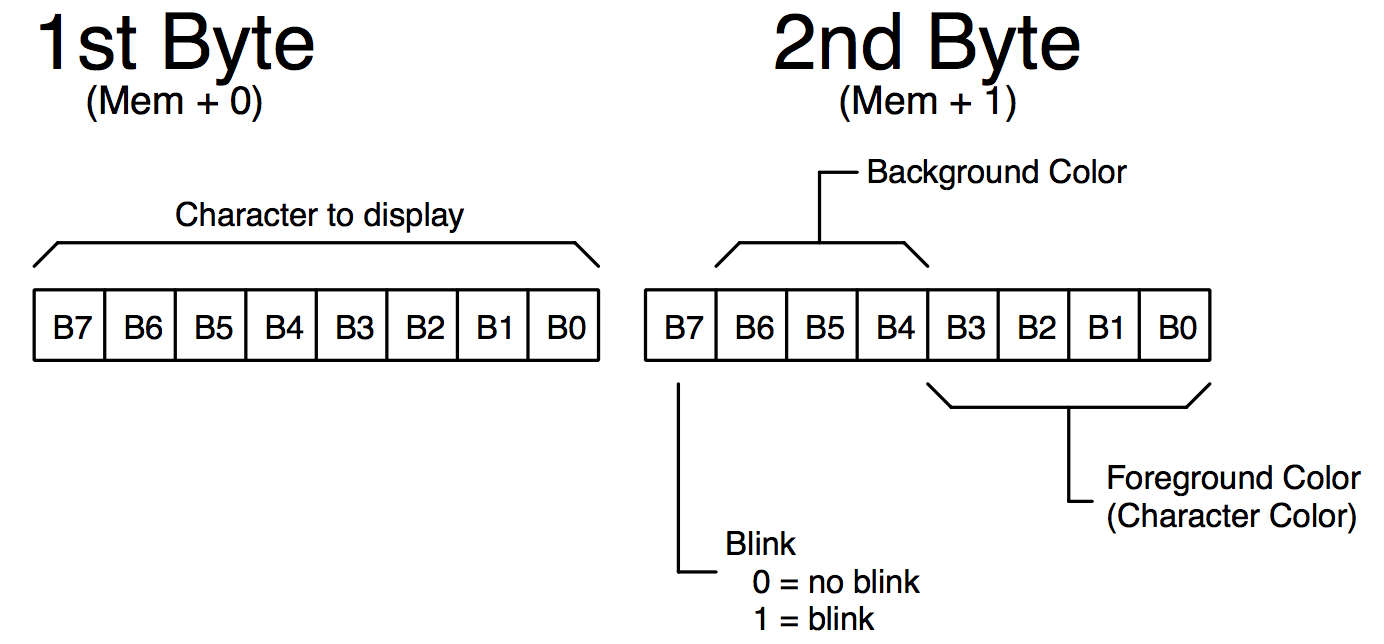
Each displayable character requires two bytes to display. The first byte (lowest memory location) is the character that you want to display while the second byte (next memory location) is an attribute that determines the foreground/background color combination of the character. The foreground color is specified in the lower 4 bits of the attribute while the background color appears in bits 4 to 6. Finally, the most-significant bit determines whether the character will blink (when 1) or not (when 0). The character and attribute bytes are shown in figure 20-2.
The tables below show the possible colors that can be obtained from the PC’s VGA character mode.
Blink (B7)
| Blink? | #define | Hex |
|---|---|---|
| No | 0x00 | |
| Yes | DISP_BLINK | 0xB0 |
Background Color (B6 BS B4)
| Color | #define | Hex |
|---|---|---|
| Black | DISP_BGND_BLACK | 0x00 |
| Blue | DISP_BGND_BLUE | 0x10 |
| Green | DISP_BGND_GREEN | 0x20 |
| Cyan | DISP_BGND_CYAN | 0x30 |
| Red | DISP_BGND_RED | 0x40 |
| Purple | DISP_BGND_PURPLE | 0x50 |
| Brown | DISP_BGND_BROWN | 0x60 |
| Light Gray | DISP_BGND_LIGHT_GRAY | 0x70 |
Foreground Color (B3 B2 B1 B0)
| Color | #define | Hex |
|---|---|---|
| Black | DISP_FGND_BLACK | 0x00 |
| Blue | DISP_FGND_BLUE | 0x01 |
| Green | DISP_FGND_GREEN | 0x02 |
| Cyan | DISP_FGND_CYAN | 0x03 |
| Red | DISP_FGND_RED | 0x04 |
| Purple | DISP_FGND_PURPLE | 0x05 |
| Brown | DISP_FGND_BROWN | 0x06 |
| Light Gray | DISP_FGND_LIGHT_GRAY | 0x07 |
| Dark Gray | DISP_FGND_DARK_GRAY | 0x0B |
| Light Blue | DISP_FGND_LIGHT_BLUE | 0x09 |
| Light Green | DISP_FGND_LIGHT_GREEN | 0x0A |
| Light Cyan | DISP_FGND_LIGHT_CYAN | 0x0B |
| Light Red | DISP_FGND_LIGHT_RED | 0x0C |
| Light Purple | DISP_FGND_LIGHT_PURPLE | 0x0D |
| Yellow | DISP_FGND_YELLOW | 0x0E |
| White | DISP_FGND_WHITE | 0x0F |
You will note that you can only have 8 possible background colors but a choice of 16 foreground colors. PC.H contains #defines which allow you to select the proper combination of foreground and background colors. These #defines are shown in Table 20-1. For example, to obtain a non-blinking WHITE character on a BLACK background, you would simply add DISP_FGND_WHITE and DISP_BGND_BLACK (FGND means foreground and BGND is background). This corresponds to a HEX value of 0x07 which happens to be the default video attribute of a displayable character on a PC. You should note that because DISP_BGND_BLACK has a value of 0x00, you don’t actually need to specify it and thus, the attribute for the same WHITE character could just as well have been specified as DISP_FGND_WHITE. You should use the #define constants instead of the HEX values to make your code more readable.
The display functions in PC.C are used to write ASCII (and special) characters anywhere on the screen using X and Y coordinates. The coordinate system of the display is shown in Figure 20-1. You should note that position 0,0 is located at the upper left corner as opposed to the bottom left corner as you may have expected. This makes the computation of the location of each character to display easier to determine. The address in video memory for any character on the screen is given by:
Address of Character = 0x000B8000 + Y * 160 + X * 2
The address of the attribute byte is at the next memory location or:
Address of Attribute = 0x000B8000 + Y * 160 + X * 2 + 1
The display functions provided in PC.C perform direct writes to video RAM even though BIOS (Basic Input Output System) services in most PC can do the same thing but in a portable fashion. I chose to write directly to video memory for performance reasons.
PC.C contains the following five functions which are further described in the interface section of this chapter.
PC_DispChar() | To display a single ASCII character anywhere on the screen |
PC_DispClrCol() | To clear a single column |
PC_DispClrRow() | To clear a single row (or line) |
PC_DispClrScr() | To clear the screen |
PC_DispStr() | To display an ASCII string anywhere on the screen |
Saving and Restoring DOS’s Context
The current DOS environment is saved by calling PC_DOSSaveReturn (see listing 18.1) and would be called by main to:
- Setup µC/OS-II’s context switch vector
- Setup the tick ISR vector
- Save DOS’s context so that we can return back to DOS when we need to terminate execution of a µC/OS-II based application
A lot happens in PC_DOSSaveReturn() so you may need to look at the code in listing 18.1 to follow along.
void PC_DOSSaveReturn (void)
{
    PC_ExitFlag  = FALSE;                                      (1)
    OSTickDOSCtr =     1;                                      (2)
    PC_TickISR   = PC_VectGet(VECT_TICK);                      (3)

    OS_ENTER_CRITICAL();
    PC_VectSet(VECT_DOS_CHAIN, PC_TickISR);                    (4)
    OS_EXIT_CRITICAL();

    setjmp(PC_JumpBuf);                                        (5)
    if (PC_ExitFlag == TRUE) {
        OS_ENTER_CRITICAL();
        PC_SetTickRate(18);                                    (6)
        PC_VectSet(VECT_TICK, PC_TickISR);                     (7)
        OS_EXIT_CRITICAL();
        PC_DispClrScr(DISP_FGND_WHITE + DISP_BGND_BLACK);      (8)
        exit(0);                                               (9)
    }
}
(1) PC_DOSSaveReturn starts by setting the flag PC_ExitFlag to FALSE indicating that we are not returning to DOS.
(2) Then, PC_DOSSaveReturn initializes OSTickDOSCtr to 1 because this variable will be decremented in OSTickISR. A value of 0 would have caused this value to wrap around to 255 when decremented by OSTickISR.
(3)
(4) PC_DOSSaveReturn then saves DOS’s tick handler in a free vector table entry so it can be called by µC/OS-II’s tick handler (this is called chaining the vectors).
(5) Next, PC_DOSSaveReturn calls setjmp, which captures the state of the processor (i.e., the contents of all important registers) into a structure called PC_JumpBuf. Capturing the processor's context will allow us to return to PC_DOSSaveReturn and execute the code immediately following the call to setjmp. Because PC_ExitFlag was initialized to FALSE [see L18.1(1)], PC_DOSSaveReturn skips the code in the if statement and returns to the caller (i.e., main).
(5) This brings the processor back in PC_DOSSaveReturn (just after the call to setjmp).
This time, however, PC_ExitFlag is TRUE and the code following the if statement is executed.
(7)
(8)
(9) PC_DOSSaveReturn changes the tick rate back to 18.2 Hz, restores the PC’s tick ISR handler, clears the screen and returns to the DOS prompt through the exit(0) function.
void PC_DOSReturn (void)
{
    PC_ExitFlag = TRUE;                                        (1)
    longjmp(PC_JumpBuf, 1);                                    (2)
}
(1)
(2) When you want to return to DOS, all you have to do is call PC_DOSReturn (see listing 18.2) which sets PC_ExitFlag to TRUE and execute a longjmp.
Elapsed Time Measurement
The elapsed time measurement functions are used to determine how much time a function takes to execute. Time measurement is performed by using the PC’s 82C54 timer #2. You make time measurement by wrapping the code to measure by the two functions PC_ElapsedStart and PC_ElapsedStop. However, before you can use these two functions, you need to call the function PC_ElapsedInit. PC_ElapsedInit basically computes the overhead associated with the other two functions. This way, the execution time (in microseconds) returned by PC_ElapsedStop consist exclusively of the code you are measuring. Note that none of these functions are reentrant and thus, you must be careful that you do not invoke them from multiple tasks at the same time. .
Miscellaneous
PC_GetDateTime is a function that obtains the PC’s current date and time, and formats this information into an ASCII string. The format is:
"YYYY-MM-DD HH:MM:SS"
and you will need at least 21 characters (including the NUL character) to hold this string. You should note that there are 2 spaces between the date and the time which explains why you need 21 characters instead of 20. PC_GetDateTime uses the Borland C/C++ library functions gettime and getdate which should have their equivalent on other DOS compilers.
PC_GetKey is a function that checks to see if a key was pressed and if so, obtains that key, and returns it to the caller. PC_GetKey uses the Borland C/C++ library functions kbhit and getch which again, have their equivalent on other DOS compilers.
PC_SetTickRate allows you to change the tick rate for µC/OS-II by specifying the desired frequency. Under DOS, a tick occurs 18.20648 times per second or, every 54.925 mS. This is because the 82C54 chip used didn’t get its counter initialized and the default value of 65535 takes effect. Had the chip been initialized with a divide by 59659, the tick rate would have been a very nice 20.000 Hz! I decided to change the tick rate to something more ‘exciting’ and thus, decided to use about 200 Hz (actually 199.9966). The code found in OS_CPU_A.O calls the DOS tick handler one time out of 11. This is done to ensure that some of the housekeeping needed in DOS is maintained. You would not need to do this if you were to set the tick rate to 20 Hz. Before returning to DOS, PC_SetTickRate is called by specifying 18 as the desired frequency. PC_SetTickRate will know that you actually mean 18.2 Hz and will correctly set the 82C54.
The last two functions in PC.C are used to get and set an interrupt vector. PC_VectGet and PC_VectSet should be compiler independent as long as the compiler support the macros MK_FP (make far pointer), FP_OFF (get the offset portion of a far pointer) and, FP_SEG (get the segment of a far pointer).
Interface Functions
This section provides a reference section for the PC services.
PC_DispChar()
void PC_DispChar(INT8U x, INT8U y, INT8U c, INT8U color)
PC_DispChar allows you to display a single ASCII (or special) character anywhere on the display.
Arguments
x and y specifies the coordinates (col, row) where the character will appear. rows (i.e., lines) are numbered from 0 to DISP_MAX_Y – 1, and columns are numbered from 0 to DISP_MAX_X – 1 (see PC.C).
cis the character to display. You can specify any ASCII characters and special characters if c has a value higher than 128. You can see what characters (i.e., symbols) will be displayed based on the value of c by running the test code provided in this book as follows:
C:\SOFTWARE\BLOCKS\SAMPLE\TEST > TEST display
color specifies the contents of the attribute byte and thus the color combination of the character to be displayed. You can add one DISP_FGND_??? (see PC.H) and one DISP_BGND_??? (see PC.H) to obtain the desired color combination.
Returned Value
NONE
Notes/Warnings
NONE
Example
   void Task (void *pdata)
   {
      .
      .
      for (;;) {
         .
         PC_DispChar(0, 0, '$', DISP_FGND_WHITE);
         .
         .
      }
   }
PC_DispClrCol()
void PC_DispClrCol(INT8U x, INT8U color)
PC_DispClrCol allows you to clear the contents of a column (all 25 characters).
Arguments
x specifies which column will be cleared. Columns are numbered from 0 to DISP_MAX_X – 1 (see PC.C).
color specifies the contents of the attribute byte. Because the character used to clear a column is the space character (i.e., ‘ ‘), only the background color will appear. You can thus specify any of the DISP_BGND_??? colors.
Returned Value
NONE
Notes/Warnings
NONE
Example
   void Task (void *pdata)
   {
      .
      .
      for (;;) {
         .
         PC_DispClrCol(0, DISP_BGND_BLACK);
         .
         .
      }
   }
PC_DispClrRow()
void PC_DispClrRow(INT8U y, INT8U color)
PC_DispClrRow allows you to clear the contents of a row (all 80 characters).
Arguments
y specifies which row (i.e., line) will be cleared. Rows are numbered from 0 to DISP_MAX_Y – 1 (see PC.C).
color specifies the contents of the attribute byte. Because the character used to clear a row is the space character (i.e., ‘ ‘), only the background color will appear. You can thus specify any of the DISP_BGND_??? colors.
Returned Value
NONE
Notes/Warnings
NONE
Example
   void Task (void *pdata)
   {
      .
      .
      for (;;) {
         .
         PC_DispClrRow(10, DISP_BGND_BLACK);
         .
         .
      }
   }
PC_DispClrScr()
void PC_DispClrScr(INT8U color)
PC_DispClrScr allows you to clear the entire display.
Arguments
color specifies the contents of the attribute byte. Because the character used to clear the screen is the space character (i.e., ‘ ‘), only the background color will appear. You can thus specify any of the DISP_BGND_??? colors.
Returned Value
NONE
Notes/Warnings
You should use DISP_FGND_WHITE instead of DISP_BGND_BLACK because you don’t want to leave the attribute field with black on black.
Example
   void Task (void *pdata)
   {
      .
      .
      PC_DispClrScr(DISP_FGND_WHITE);
      for (;;) {
         .
         .
         .
      }
   }
PC_DispStr()
void PC_DispStr(INT8U x, INT8U y, INT8U *s, INT8U color)
PC_DispStr allows you to display an ASCII string. In fact, you could display an array containing any of 255 characters as long as the array itself is NUL terminated.
Arguments
x and y specifies the coordinates (col, row) where the first character will appear. rows (i.e., lines) are numbered from 0 to DISP_MAX_Y – 1, and columns are numbered from 0 to DISP_MAX_X – 1 (see PC.C).
s is a pointer to the array of characters to display. The array MUST be NUL terminated. Note that you can display any characters from 0x01 to 0xFF.
color specifies the contents of the attribute byte and thus the color combination of the characters to be displayed. You can add one DISP_FGND_??? (see PC.H) and one DISP_BGND_??? (see PC.H) to obtain the desired color combination.
Returned Value
NONE
Notes/Warnings
All the characters of the string or array will be displayed with the same color attributes.
Example #1
The code below displays the current value of a global variable called Temperature. The color used depends on whether the temperature is below 100 (white), below 200 (yellow) or if it exceeds 200 (blinking white on a red background).
FP32 Temperature;


void Task (void *pdata)
{
    char s[20];

   .
   .
   PC_DispStr(0, 0, "Temperature:",
              DISP_FGND_YELLOW + DISP_BGND_BLUE);
   for (;;) {
      sprintf(s, "%6.1f", Temperature);
      if (Temperature < 100.0) {
          color = DISP_FGND_WHITE;
      } else if (Temperature < 200.0) {
          color = DISP_FGND_YELLOW;
      } else {
          color = DISP_FGND_WHITE + DISP_BGND_RED + DISP_BLINK;
      PC_DispStr(13, 0, s, color);
      .
      .
   }
}
Example #2
The code below displays a square b0x 10 characters wide by 7 characters high in the center of the screen.
INT8U  B0x[7][11] = {
    {0xDA, 0xC4, 0xC4, 0xC4, 0xC4, 0xC4, 0xC4, 0xC4, 0xC4, 0xBF, 0x00},
    {0xB3, 0x20, 0x20, 0x20, 0x20, 0x20, 0x20, 0x20, 0x20, 0xB3, 0x00},
    {0xB3, 0x20, 0x20, 0x20, 0x20, 0x20, 0x20, 0x20, 0x20, 0xB3, 0x00},
    {0xB3, 0x20, 0x20, 0x20, 0x20, 0x20, 0x20, 0x20, 0x20, 0xB3, 0x00},
    {0xB3, 0x20, 0x20, 0x20, 0x20, 0x20, 0x20, 0x20, 0x20, 0xB3, 0x00},
    {0xB3, 0x20, 0x20, 0x20, 0x20, 0x20, 0x20, 0x20, 0x20, 0xB3, 0x00},
    {0xC0, 0xC4, 0xC4, 0xC4, 0xC4, 0xC4, 0xC4, 0xC4, 0xC4, 0xD9, 0x00}
};


void Task (void *pdata)
{
    INT8U i;


   .
   .
   for (i = 0; i < 7; i++) {
      PC_DispStr(35, i + 9, B0x[i], DISP_FGND_WHITE);
   }
   for (;;) {
      .
      .
   }
}
PC_DOSReturn()
void PC_DOSReturn(void)
PC_DOSReturn allows your application to return back to DOS. It is assumed that you have previously called PC_DOSSaveReturn in order to save the processor’s important registers in order to properly return to DOS. See section 18.02 for a description on how to use this function.
Arguments
NONE
Returned Value
NONE
Notes/Warnings
You MUST have called PC_DOSSaveReturn prior to calling PC_DOSReturn.
Example
void Task (void *pdata)
{
   INT16U key;

   .
   .
   for (;;) {
      .
      .
      if (PC_GetKey(&key) == TRUE) {
          if (key == 0x1B) {
              PC_DOSReturn();                  /* Return to DOS */
          }
      }
      .
      .
   }
}
PC_DOSSaveReturn()
void PC_DOSSaveReturn(void)
PC_DOSSaveReturn allows your application to save the processor’s important registers in order to properly return to DOS before you actually start multitasking with µC/OS-II. You would normally call this function from main as shown in the example code provided below.
Arguments
NONE
Returned Value
NONE
Notes/Warnings
You MUST call this function prior to setting µC/OS-II’s context switch vector (as shown below).
Example
void  main (void)
{
    OSInit();                  /* Initialize uC/OS-II              */
    .
    PC_DOSSaveReturn();        /* Save DOS's environment           */
    .
    PC_VectSet(uCOS, OSCtxSw); /* uC/OS-II's context switch vector */
    OSTaskCreate(...);
    .
    .
    OSStart();                 /* Start multitasking               */
}
PC_ElapsedInit()
void PC_ElapsedInit(void)
PC_ElapsedInit is invoked to compute the overhead associated with the PC_ElapsedStart and PC_ElapsedStop calls. This allows PC_ElapsedStop to return return the execution time (in microseconds) of the code you are trying to measure.
Arguments
NONE
Returned Value
NONE
Notes/Warnings
You MUST call this function prior to calling either PC_ElapsedStart() and PC_ElapsedStop().
Example
void  main (void)
{
    OSInit();                  /* Initialize uC/OS-II              */
    .
    .
    PC_ElapsedInit();          /* Compute overhead of elapse meas. */
    .
    .
    OSStart();                 /* Start multitasking               */
}
PC_ElapsedStart()
void PC_ElapsedStart(void)
PC_ElapsedStart is used in conjunction with PC_ElapsedStop to measure the execution time of some of your application code.
Arguments
NONE
Returned Value
NONE
Notes/Warnings
You MUST call PC_ElapsedInit before you use either PC_ElapsedStart() and PC_ElapsedStop().
This function is non-reentrant and cannot be called by multiple tasks without proper protection mechanisms (i.e., semaphores, locking the scheduler, etc.).
The execution time of your code must be less than 54.93 milliseconds in order for the elapsed time measurement functions to work properly.
Example
void  main (void)
{
    OSInit();                  /* Initialize uC/OS-II              */
    .
    .
    PC_ElapsedInit();          /* Compute overhead of elapse meas. */
    .
    .
    OSStart();                 /* Start multitasking               */
}


void Task (void *pdata)
{
   INT16U time_us;

   .
   .
   for (;;) {
      .
      .
      PC_ElapsedStart();
      /* Code you want to measure the execution time */
      time_us = PC_ElaspedStop();
      .
      .
   }
}
PC_ElapsedStop()
INT16U PC_ElapsedStop(void)
PC_ElapsedStop is used in conjunction with PC_ElapsedStart to measure the execution time of some of your application code.
Arguments
NONE
Returned Value
The execution time of your code that was wrapped between PC_ElapsedStart() and PC_ElapsedStop(). The execution time is returned in microseconds.
Notes/Warnings
You MUST call PC_ElapsedInit() before you use either PC_ElapsedStart() and PC_ElapsedStop().
This function is non-reentrant and cannot be called by multiple tasks without proper protection mechanisms (i.e., semaphores, locking the scheduler, etc.).
The execution time of your code must be less than 54.93 milliseconds in order for the elapsed time measurement functions to work properly.
Example
See PC_ElapsedStart().
PC_GetDateTime()
void PC_GetDateTime(char *s)
PC_GetDateTime is used to obtain the current date and time from the PC’s real-time clock chip and return this information in an ASCII string that can hold at least 21 characters.
Arguments
s is a pointer to the storage area where the ASCII string will be deposited. The format of the ASCII string is:
"YYYY-MM-DD HH:MM:SS"
and requires 21 bytes of storage (note that there is 2 spaces between the date and the time.
Returned Value
NONE
Notes/Warnings
NONE
Example
void Task (void *pdata)
{
   char s[80];

   .
   .
   for (;;) {
      .
      .
      PC_GetDateTime(&s[0]);
      PC_DispStr(0, 24, s, DISP_FGND_WHITE);
      .
      .
   }
}
PC_GetKey()
BOOLEAN PC_GetDateTime(INT16S *key)
PC_GetKey is used to see if a key was pressed at the PC’s keyboard and if so, obtain the value of the key pressed. You would normally invoke this function every so often (i.e., poll the keyboard) to see if a key was pressed. Note that the PC actually obtains key presses through an ISR and buffers key presses. Up to 10 keys are buffered by the PC.
Arguments
key is a pointer to where the key value will be stored. If no key has been pressed, the value will contain 0x00.
Returned Value
TRUE is a key was pressed and FALSE otherwise.
Notes/Warnings
NONE
Example
void Task (void *pdata)
{
   INT16S   key;
   BOOLEAN  avail;

   .
   .
   for (;;) {
      .
      .
      avail = PC_GetKey(&key);
      if (avail == TRUE) {
         /* Process key pressed */
      }
      .
      .
   }
}
PC_SetTickRate()
void PC_SetTickRate(INT16U freq)
PC_SetTickRate is used to change the PC’s tick rate from the standard 18.20648 Hz to something faster. A tick rate of 200 Hz is a multiple of 18.20648 Hz (the multiple is 11).
Arguments
freq is the desired frequency of the ticker.
Returned Value
NONE
Notes/Warnings
You can only make the ticker faster than 18.20648 Hz.
The higher the frequency, the more overhead you will impose on the CPU.
Example
void  Task (void *pdata)
{
    .
    .
    OS_ENTER_CRITICAL();
    PC_VectSet(0x08, OSTickISR);
    PC_SetTickRate(400);       /* Reprogram PC's tick rate to 400 Hz */
    OS_EXIT_CRITICAL();
    .
    .
    for (;;) {
        .
        .
    }
}
PC_VectGet()
void *PC_VectGet(INT8U vect)
PC_VectGet is used to obtain the address of the interrupt handler specified by the interrupt vector number. An 80x86 processor supports up to 256 interrupt/exception handlers.
Arguments
vect is the interrupt vector number, a number between 0 and 255.
Returned Value
The address of the current interrupt/exception handler for the specified interrupt vector number.
Notes/Warnings
Vector number 0 corresponds to the RESET handler.
It is assumed that the 80x86 code is compiled using the ‘large model’ option and thus all pointers returned are ‘far pointers’.
It is assumed that the 80x86 is running in ‘real mode’.
Example
void  Task (void *pdata)
{
    void (*p_tick_isr)(void);


    .
    .
    p_tick_isr = PC_VectGet(0x08);  /* Get tick handler address */
    .
    .
    for (;;) {
        .
        .
    }
}
PC_VectSet()
void PC_VectSet(INT8U vect, void *(pisr)(void))
PC_VectSet is used to set the contents of an interrupt vector table location. An 80x86 processor supports up to 256 interrupt/exception handlers.
Arguments
vect is the interrupt vector number, a number between 0 and 255.
pisr is the address of the interrupt/exception handler.
Returned Value
NONE
Notes/Warnings
You should be careful when setting interrupt vectors. Some interrupt vectors are used by the operating system (DOS and/or µC/OS-II).
It is assumed that the 80x86 code is compiled using the ‘large model’ option and thus all pointers returned are ‘far pointers’.
If your interrupt handler works in conjunction with µC/OS-II, it must follow the rules imposed by µC/OS-II (see page 91 of “MicroC/OS-II, The Real-Time Kernel”, ISBN 0-87930-543-6).
Example
void  InterruptHandler (void)
{
}


void  Task (void *pdata)
{
    .
    .
    PC_VectSet(64, InterruptHandler);
    .
    .
    for (;;) {
        .
        .
    }
}