Porting µC/OS-II
- Former user (Deleted)
- WES Admin
This chapter describes in general terms what needs to be done in order to adapt µC/OS-II to different processors. Adapting a real-time kernel to a microprocessor or a microcontroller is called a port. Most of µC/OS-II is written in C for portability; however, it is still necessary to write some processor-specific code in C and assembly language. Specifically, µC/OS-II manipulates processor registers, which can only be done through assembly language. Porting µC/OS-II to different processors is relatively easy because µC/OS-II was designed to be portable. If you already have a port for the processor you are intending to use, you dont need to read this chapter, unless of course you want to know how µC/OS-II processor-specific code works.
µC/OS-II Hardware/Software Architecture
A processor can run µC/OS-II if it satisfies the following general requirements:
- The processor has a C compiler that generates reentrant code.
- Interrupts can be disabled and enabled from C.
- The processor supports interrupts and can provide an interrupt that occurs at regular intervals (typically between 10 and 100Hz).
- The processor supports a hardware stack that can accommodate a fair amount of data (possibly many kilobytes).
- The processor has instructions to load and store the stack pointer and other CPU registers, either on the stack or in memory.
Processors like the Motorola 6805 series do not satisfy requirements number 4 and 5, so µC/OS-II cannot run on such processors.
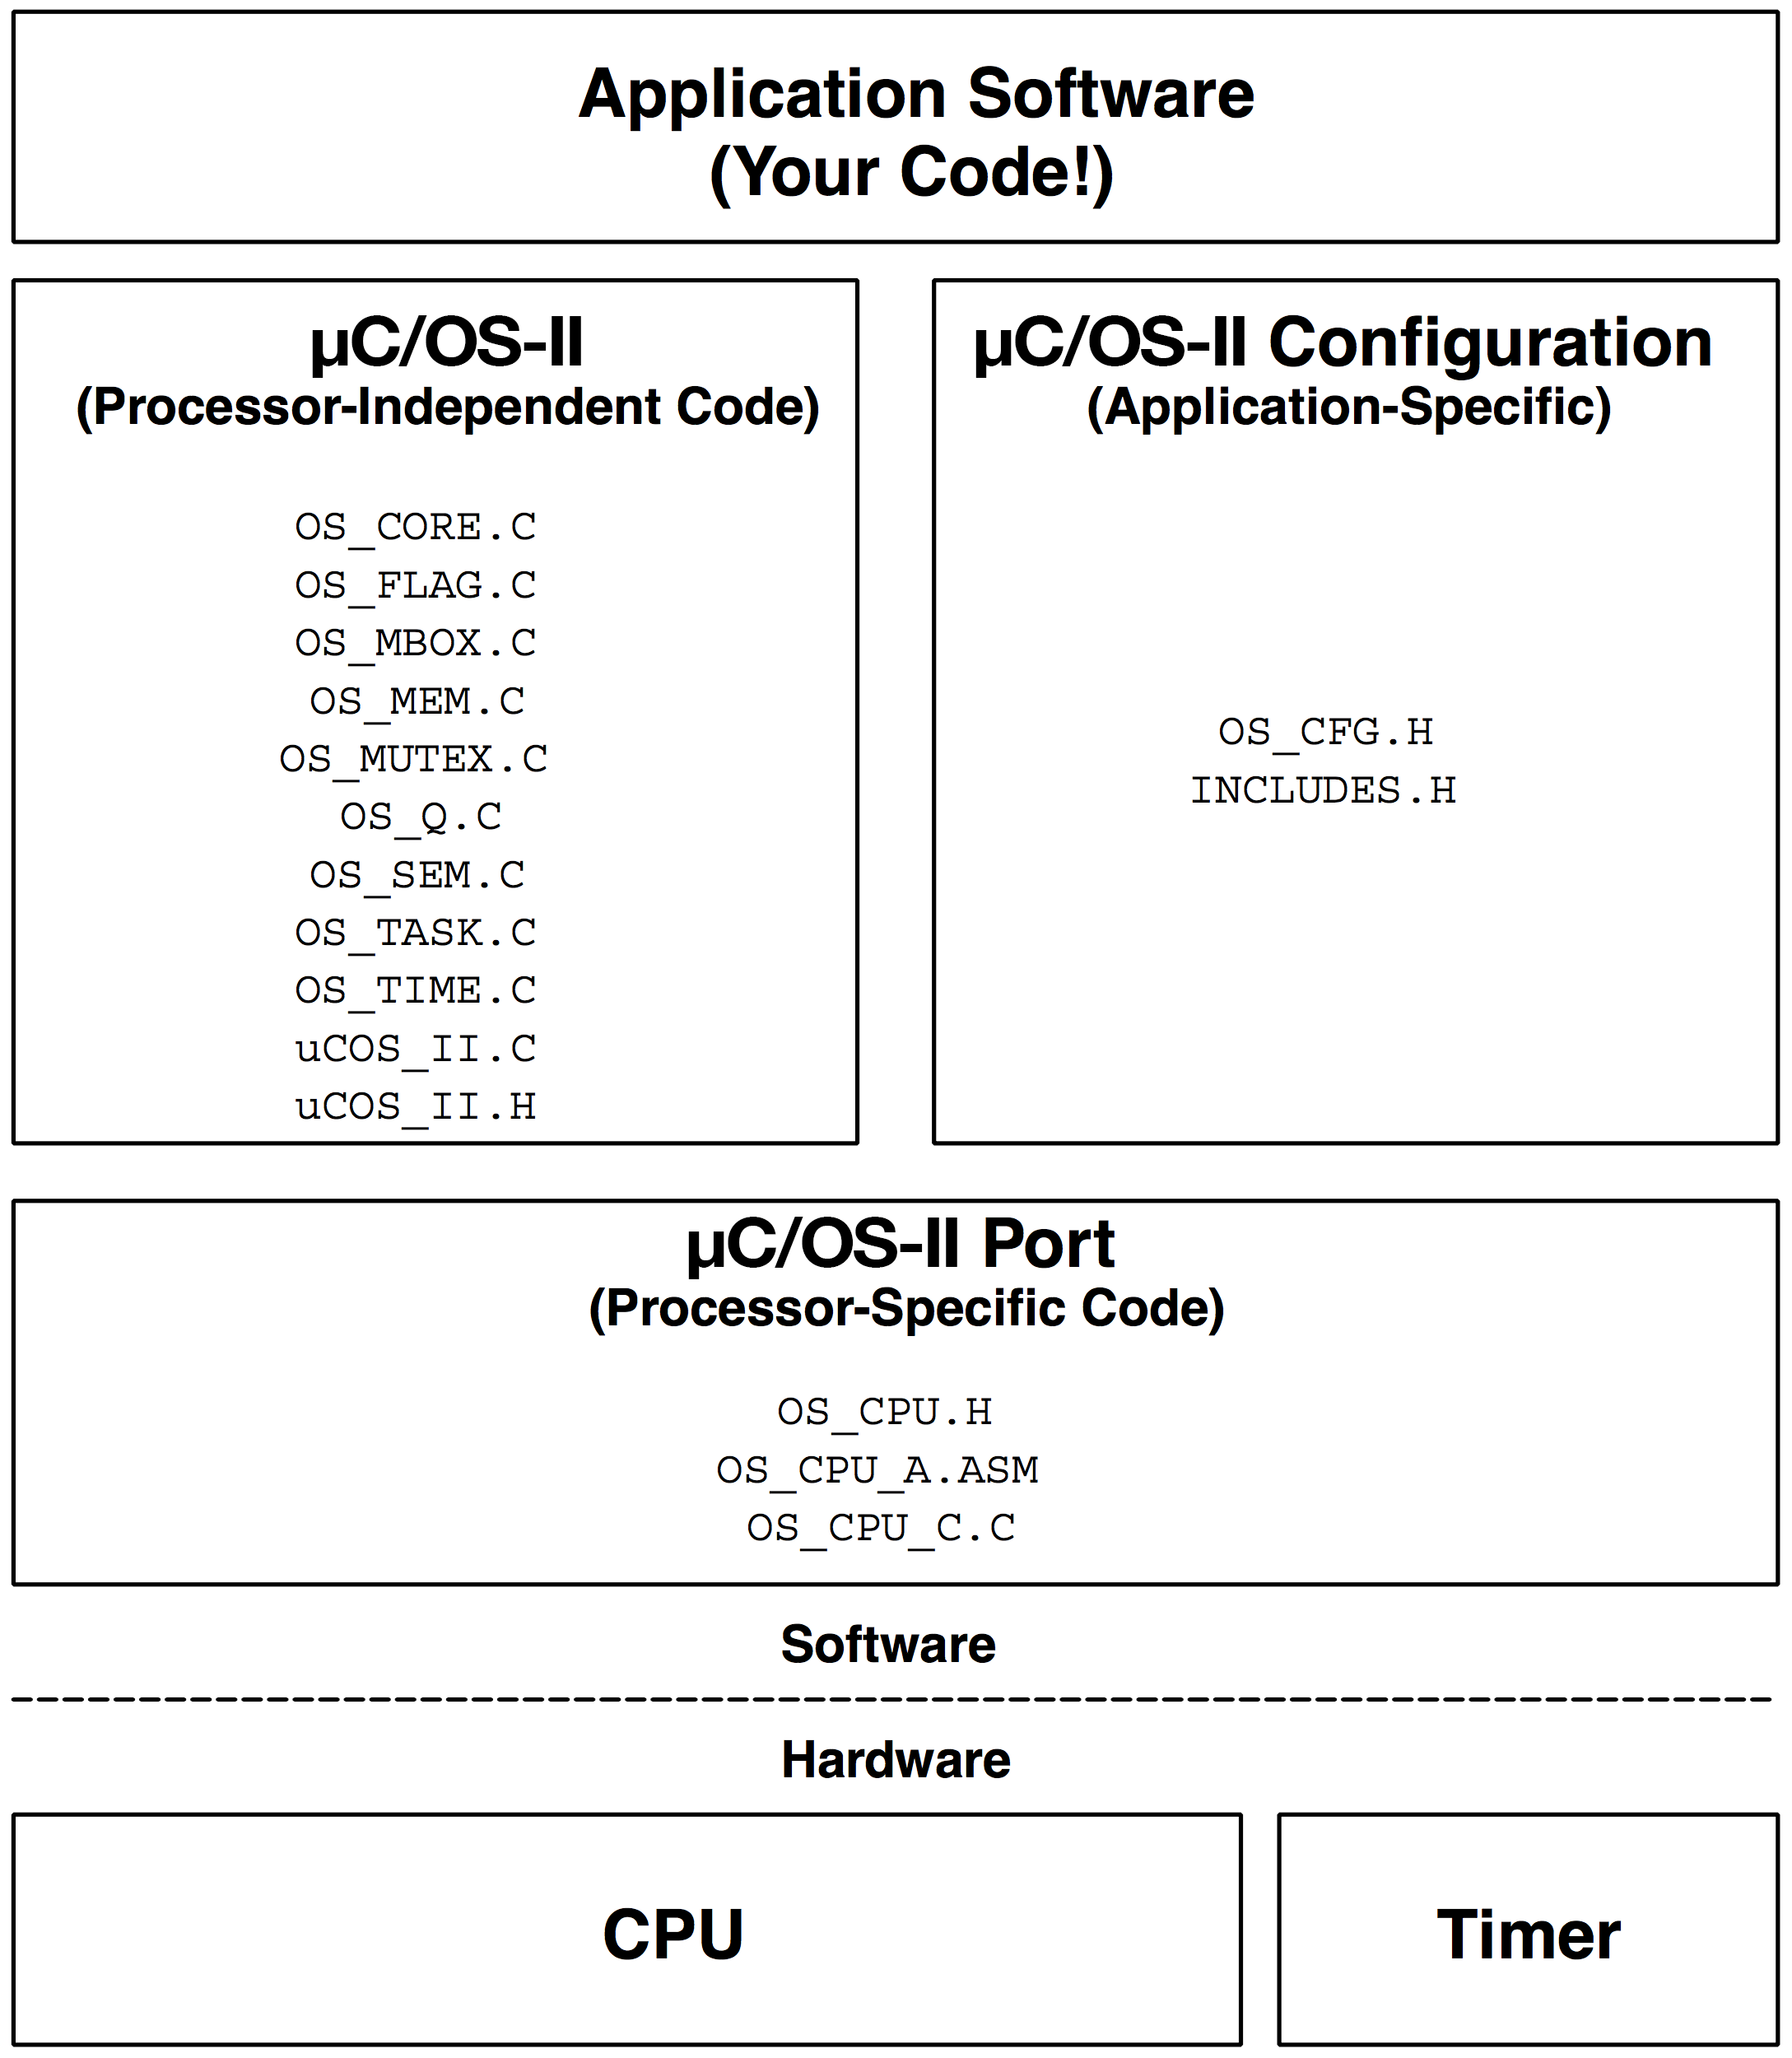
Figure 13.1 shows the µC/OS-II architecture and its relationship with the hardware. When you use µC/OS-II in an application, you are responsible for providing the Application Software and the µC/OS-II Configuration sections. This book and companion CD contains all the source code for the Processor-Independent Code section as well as the Processor-Specific Code section for the Intel 80x86, real mode, large model. If you intend to use µC/OS-II on a different processor, you need to either obtain a copy of a port for the processor you intend to use or write one yourself if the desired processor port has not already been ported. Check the Micrium Web site at www.micrium.com for a list of available ports. In fact, you may want to look at other ports and learn from the experience of others.
Porting µC/OS-II is actually quite straightforward once you understand the subtleties of the target processor and the C compiler you are using. Depending on the processor, a port can consist of writing or changing between 50 and 300 lines of code and could take anywhere from a few hours to about a week to accomplish. The easiest thing to do, however, is to modify an existing port from a processor that is similar to the one you intend to use. Table 3.1 summarizes the code you will have to write or modify. I decided to add a column which indicates the relative complexity involved: 1 means easy, 2 means average and 3 means more complicated.
| Name | Type | File | C or Assembly? | Complexity |
|---|---|---|---|---|
BOOLEAN | Data Type | OS_CPU.H | C | 1 |
INT8U | Data Type | OS_CPU.H | C | 1 |
INT8S | Data Type | OS_CPU.H | C | 1 |
INT16U | Data Type | OS_CPU.H | C | 1 |
INT16S | Data Type | OS_CPU.H | C | 1 |
INT32U | Data Type | OS_CPU.H | C | 1 |
INT32S | Data Type | OS_CPU.H | C | 1 |
FP32 | Data Type | OS_CPU.H | C | 1 |
FP64 | Data Type | OS_CPU.H | C | 1 |
OS_STK | Data Type | OS_CPU.H | C | 2 |
OS_CPU_SR | Data Type | OS_CPU.H | C | 2 |
OS_CRITICAL_METHOD | #define | OS_CPU.H | C | 3 |
OS_STK_GROWTH | #define | OS_CPU.H | C | 1 |
OS_ENTER_CRITICAL() | Macro | OS_CPU.H | C | 3 |
OS_EXIT_CRITICAL() | Macro | OS_CPU.H | C | 3 |
OSStartHighRdy() | Function | OS_CPU_A.ASM | Assembly | 2 |
OSCtxSw() | Function | OS_CPU_A.ASM | Assembly | 3 |
OSIntCtxSw() | Function | OS_CPU_A.ASM | Assembly | 3 |
OSTickISR() | Function | OS_CPU_A.ASM | Assembly | 3 |
OSTaskStkInit() | Function | OS_CPU_C.C | C | 3 |
OSInitHookBegin() | Function | OS_CPU_C.C | C | 1 |
OSInitHookEnd() | Function | OS_CPU_C.C | C | 1 |
OSTaskCreateHook() | Function | OS_CPU_C.C | C | 1 |
OSTaskDelHook() | Function | OS_CPU_C.C | C | 1 |
OSTaskSwHook() | Function | OS_CPU_C.C | C | 1 |
OSTaskStatHook() | Function | OS_CPU_C.C | C | 1 |
OSTCBInitHook() | Function | OS_CPU_C.C | C | 1 |
OSTimeTickHook() | Function | OS_CPU_C.C | C | 1 |
OSTaskIdleHook() | Function | OS_CPU_C.C | C | 1 |
Development Tools
As previously stated, because µC/OS-II is written mostly in ANSI C, you need an ANSI C compiler for the processor you intend to use. Also, because µC/OS-II is a preemptive kernel, you should only use a C compiler that generates reentrant code.
Your tools should also include an assembler because some of the port requires to save and restore CPU registers which are generally not accessible from C. However, some C compilers do have extensions that allow you to manipulate CPU registers directly from C or, allow you to write in-line assembly language statements.
Most C compilers designed for embedded systems also include a linker and a locator. The linker is used to combine object files (compiled and assembled files) from different modules while the locator, allows you to place the code and data anywhere in the memory map of the target processor.
Your C compiler must also provide a mechanism to disable and enable interrupts from C. Some compilers allow you to insert in-line assembly language statements into your C source code. This makes it quite easy to insert the proper processor instructions to enable and disable interrupts. Other compilers actually contain language extensions to enable and disable interrupts directly from C.
Directories and Files
The installation program provided on the distribution diskette installs µC/OS-II and the port for the Intel 80x86 (real mode, large model) on your hard disk. I devised a consistent directory structure that allows you to find the files for the desired target processor easily. If you add a port for another processor, you should consider following the same conventions.
All ports should be placed under \SOFTWARE\uCOS-II on your hard drive. You should note that I dont specify which disk drive these files should reside; I leave this up to you. The source code for each microprocessor or microcontroller port must be found in either two or three files: OS_CPU.H, OS_CPU_C.C, and, optionally, OS_CPU_A.ASM. The assembly language file is optional because some compilers allow you to have in-line assembly language, so you can place the needed assembly language code directly in OS_CPU_C.C. The directory in which the port is located determines which processor you are using. Examples of directories where different ports would be stored are shown in the Table 13.2. Note that each directory contains the same filenames, even though they have totally different targets. Also, the directory structure accounts for different C compilers. For example, the µC/OS-II port files for the Paradigm C (see www.DevTools.com) compiler would be placed in a Paradigm sub-directory. Similarly, the port files for the Borland C (see www.Borland.com) compiler V4.5 would be placed in a BC45 sub-directory. The port files for other processors such as the Motorola 68HC11 processor using a COSMIC compiler (see www.Cosmic-US.com) would be placed as shown in Table 13.2.
| Intel/AMD 80186 | \SOFTWARE\uCOS-II\Ix86L\PARADIGM \OS_CPU.H \OS_CPU_A.ASM \OS_CPU_C.C \SOFTWARE\uCOS-II\Ix86L\BC45 \OS_CPU.H \OS_CPU_A.ASM \OS_CPU_C.C |
| Motorola 68HC11 | \SOFTWARE\uCOS-II\68HC11\COSMIC \OS_CPU.H \OS_CPU_A.ASM \OS_CPU_C.C |
INCLUDES.H
As mentioned in Chapter 1, INCLUDES.H is a master include file found at the top of all .C files:
#include "includes.h"
INCLUDES.H allows every .C file in your project to be written without concern about which header file will actually be needed. The only drawback to having a master include file is that INCLUDES.H may include header files that are not pertinent to the actual .C file being compiled. This means that each file will require extra time to compile. This inconvenience is offset by code portability. I assume that you would have an INCLUDES.H in each project that uses µC/OS-II. You can thus edit the INCLUDES.H file that I provide to add your own header files, but your header files should be added at the end of the list. INCLUDES.H is not actually considered part of a port but, I decided to mention it here because every µC/OS-II file assumes it.
OS_CPU.H
OS_CPU.H contains processor- and implementation-specific #defines constants, macros, and typedefs. The general layout of OS_CPU.H is shown in Listing 13.1.
/*
**********************************************************************************
*                                  DATA TYPES
*                             (Compiler Specific)
**********************************************************************************
*/

typedef unsigned char  BOOLEAN;                                               (1)
typedef unsigned char  INT8U;       /* Unsigned  8 bit quantity           */
typedef signed   char  INT8S;       /* Signed    8 bit quantity           */
typedef unsigned int   INT16U;      /* Unsigned 16 bit quantity           */
typedef signed   int   INT16S;      /* Signed   16 bit quantity           */
typedef unsigned long  INT32U;      /* Unsigned 32 bit quantity           */
typedef signed   long  INT32S;      /* Signed   32 bit quantity           */
typedef float          FP32;        /* Single precision floating point    */  (2)
typedef double         FP64;        /* Double precision floating point    */

typedef unsigned int   OS_STK;      /* Each stack entry is 16-bit wide    */  (3)
typedef unsigned short OS_CPU_SR;   /* Define size of CPU status register */  (4)

/*
*********************************************************************************
*                             Processor Specifics
*********************************************************************************
*/
#define  OS_CRITICAL_METHOD   ??                                              (5)

#if      OS_CRITICAL_METHOD == 1
#define  OS_ENTER_CRITICAL()  ????                                            (6)
#define  OS_EXIT_CRITICAL()   ????
#endif

#if      OS_CRITICAL_METHOD == 2
#define  OS_ENTER_CRITICAL()  ????                                            (7)
#define  OS_EXIT_CRITICAL()   ????
#endif

#if      OS_CRITICAL_METHOD == 3
#define  OS_ENTER_CRITICAL()  ????                                            (8)
#define  OS_EXIT_CRITICAL()   ????
#endif


#define  OS_STK_GROWTH        1          /* Stack growth (0=Up, 1=Down) */    (9)

#define  OS_TASK_SW()         ????                                           (10)
Compiler-Specific Data Types
Because different microprocessors have different word lengths, the port of µC/OS-II includes a series of type definitions that ensures portability. Specifically, µC/OS-II code never makes use of Cs short, int, and long data types because they are inherently nonportable.
To complete the data type section, you simply need to consult your compiler documentation and find the standard C data types that correspond to the types expected by µC/OS-II.
(1) Instead, I defined integer data types that are both portable and intuitive. The INT16U data type, for example, always represents a 16-bit unsigned integer. µC/OS-II and your application code can now assume that the range of values for variables declared with this type is from 0 to 65,535. A µC/OS-II port to a 32-bit processor could mean that an INT16U is actually declared as an unsigned short instead of an unsigned int. Where µC/OS-II is concerned, however, it still deals with an INT16U. All you have to do is determine from your compiler documentation what combination of standard C data types map to the data types µC/OS-II expects.
(2) Also, for convenience, I have included floating-point data types even though µC/OS-II doesnt make use of floating-point numbers.
(3) You must tell µC/OS-II the data type of a tasks stack. This is done by declaring the proper C data type for OS_STK. If stack elements on your processor are 32 bits you can simply declare OS_STK as:
typedef INT32U OS_STK;
This assumes that the declaration of INT32U precedes that of OS_STK. When you create a task and you declare a stack for this task then, you MUST always use OS_STK as its data type.
(4) If you use OS_CRITICAL_METHOD #3 (see next section), you will need to declare the data type for the Processor Status Word (PSW) . The PSW is also called the processor flags or status register. If the PSW of your processor is 16 bit wide, simply declare it as:
typedef INT16U OS_CPU_SR;
OS_ENTER_CRITICAL(), and OS_EXIT_CRITICAL()
This section is basically a repeat of section 3.00 with some items removed and others added. I decided to repeat this text here to avoid having you flip back and forth between sections. µC/OS-II, like all real-time kernels, needs to disable interrupts in order to access critical sections of code and to reenable interrupts when done. This allows µC/OS-II to protect critical code from being entered simultaneously from either multiple tasks or ISRs.
Processors generally provide instructions to disable/enable interrupts, and your C compiler must have a mechanism to perform these operations directly from C. Some compilers allow you to insert in-line assembly language statements into your C source code. This makes it quite easy to insert processor instructions to enable and disable interrupts. Other compilers contain language extensions to enable and disable interrupts directly from C.
To hide the implementation method chosen by the compiler manufacturer, µC/OS-II defines two macros to disable and enable interrupts: OS_ENTER_CRITICAL() and OS_EXIT_CRITICAL(), respectively (see L13.1(5) through L13.1(8)).
OS_ENTER_CRITICAL() and OS_EXIT_CRITICAL() are always used in pair to wrap critical sections of code as shown in listing 13.2.
{
    .
    .
    OS_ENTER_CRITICAL();
    /* μC/OS-II critical code section */
    OS_EXIT_CRITICAL();
    .
    .
}
Your application can also use OS_ENTER_CRITICAL() and OS_EXIT_CRITICAL() to protect your own critical sections of code. Be careful, however, because your application will crash (i.e., hang) if you disable interrupts before calling a service such as OSTimeDly() (see chapter 5). This happens because the task is suspended until time expires, but because interrupts are disabled, you would never service the tick interrupt! Obviously, all the PEND calls are also subject to this problem, so be careful. As a general rule, you should always call µC/OS-II services with interrupts enabled!
OS_ENTER_CRITICAL() and OS_EXIT_CRITICAL() can be implemented using three different methods. You only need one of the three methods even though I show OS_CPU.H (Listing 13.1) containing three different methods. The actual method used by your application depends on the capabilities of the processor as well as the compiler used. The method used is selected by the #define constant OS_CRITICAL_METHOD which is defined in OS_CPU.H of the port you will be using for your application (i.e., product). The #define constant OS_CRITICAL_METHOD is necessary in OS_CPU.H because µC/OS-II allocates a local variable called cpu_sr if OS_CRITICAL_METHOD is set to 3.
OS_CRITICAL_METHOD == 1
The first and simplest way to implement these two macros is to invoke the processor instruction to disable interrupts for OS_ENTER_CRITICAL() and the enable interrupts instruction for OS_EXIT_CRITICAL(). However, there is a little problem with this scenario. If you call a µC/OS-II function with interrupts disabled, on return from a µC/OS-II service (i.e., function), interrupts would be enabled! If you had disabled interrupts prior to calling µC/OS-II, you may want them to be disabled on return from the µC/OS-II function. In this case, this implementation would not be adequate. However, with some processors/compilers, this is the only method you can use. An example declaration is shown in listing 13.3. Here, I assume that the compiler you are using provides you with two functions to disable and enable interrupts, respectively. The names disable_int() and enable_int() are arbitrarily chosen for sake of illustration. You compiler may have different names for them.
#define OS_ENTER_CRITICAL() disable_int() /* Disable interrupts */
#define OS_EXIT_CRITICAL() enable_int() /* Enable interrupts */
OS_CRITICAL_METHOD == 2
The second way to implement OS_ENTER_CRITICAL() is to save the interrupt disable status onto the stack and then disable interrupts. OS_EXIT_CRITICAL() is implemented by restoring the interrupt status from the stack. Using this scheme, if you call a µC/OS-II service with interrupts either enabled or disabled, the status is preserved across the call. In other words, interrupts would be enabled after the call if they were enabled before the call and, interrupts would be disabled after the call if they were disabled before the call. Be careful when you call a µC/OS-II service with interrupts disabled because you are extending the interrupt latency of your application. The pseudo code for these macros is shown in Listing 13.4.
#define OS_ENTER_CRITICAL() \
       asm( PUSH PSW);    \
       asm( DI);

#define OS_EXIT_CRITICAL() \
       asm( POP PSW);
Here, I'm assuming that your compiler will allow you to execute inline assembly language statements directly from your C code as shown above (thus the asm() pseudo-function). You will need to consult your compiler documentation for this.
The PUSH PSW instruction pushes the Processor Startus Word, PSW (also known as the condition code register or, processor flags) onto the stack. The DI instruction stands for Disable Interrupts. Finally, the POP PSW instruction is assumed to restore the original state of the interrupt flag from the stack. The instructions I used are only for illustration purposes and may not be actual processor instructions.
Some compilers do not optimize inline code real well and thus, this method may not work because the compiler may not be smart enough to know that the stack pointer was changed (by the PUSH instruction). Specifically, the processor you are using may provide a stack pointer relative addressing mode which the compiler can use to access local variables or function arguments using and offset from the stack pointer. Of course, if the stack pointer is changed by the OS_ENTER_CRITICAL() macro then all these stack offsets may be wrong and would most likely lead to incorrect behavior.
OS_CRITICAL_METHOD == 3
Some compiler provides you with extensions that allow you to obtain the current value of the PSW (Processor Status Word) and save it into a local variable declared within a C function. The variable can then be used to restore the PSW back as shown in listing 13.5.
void Some_uCOS_II_Service (arguments)
{
    OS_CPU_SR cpu_sr (1)

    .
    cpu_sr = get_processor_psw(); (2)
    disable_interrupts(); (3)
    .
    /* Critical section of code */ (4)
    .
    set_processor_psw(cpu_sr); (5)
    .
}
(1) OS_CPU_SR is a µC/OS-II data type that is declared in the processor specific file OS_CPU.H. When you select this critical section method, OS_ENTER_CRITICAL() and OS_EXIT_CRITICAL() always assume the presence of the cpu_sr variable. In other words, if you use this method to protect your own critical sections, you will need to declare a cpu_sr variable in your function. However, you will not need to declare this variable in any of the µC/OS-II functions because thats already done.
(2) To enter a critical section, a function provided by the compiler vendor is called to obtain the current state of the PSW (condition code register, processor flags or whatever else this register is called for your processor). I called this function get_processor_psw() for sake of discussion but it will likely have a different name.
(3) Another compiler provided function (disable_interrupt()) is called to, of course, disable interrupts.
(4) At this point, the critical code can be execute.
(5) Once the critical section has completed, interrupts can be reenabled by calling another compiler specific extension that, for sake of discussion, I called set_processor_psw(). The function receives as an argument the previous state of the PSW. Its assumed that this function will restore the processor PSW to this value.
Because I dont know what the compiler functions are (there is no standard naming convention), the µC/OS-II macros are used to encapsulate the functionality as follows:
#define OS_ENTER_CRITICAL() \
        cpu_sr = get_processor_psw(); \
        disable_interrupts();

#define OS_EXIT_CRITICAL() \
        set_processor_psw(cpu_sr);
OS_STK_GROWTH
The stack on most microprocessors and microcontrollers grows from high to low memory. However, some processors work the other way around.
(9) µC/OS-II has been designed to be able to handle either flavor by specifying which way the stack grows through the configuration constant OS_STK_GROWTH, as shown below.
Set OS_STK_GROWTH to 0 for low to high memory stack growth.
Set OS_STK_GROWTH to 1 for high to low memory stack growth.
The reason this #define constant is provided is twofold. First, OSInit() needs to know where the top-of-stack is when its creating OSTaskIdle() and OSTaskStat(). Second, if you call OSTaskStkChk(), µC/OS-II needs to know where the bottom of stack is (high-memory or low-memory) in order to determine stack usage.
OS_TASK_SW()
(10) OS_TASK_SW()is a macro that is invoked when µC/OS-II switches from a low-priority task to the highest priority task. OS_TASK_SW() is always called from task-level code. Another mechanism, OSIntExit(), is used to perform a context switch when an ISR makes a higher priority task ready for execution. A context switch simply consists of saving the processor registers on the stack of the task being suspended and restoring the registers of the higher priority task from its stack.
In µC/OS-II, the stack frame for a ready task always looks as if an interrupt has just occurred and all processor registers were saved onto it. In other words, all that µC/OS-II has to do to run a ready task is to restore all processor registers from the tasks stack and execute a return from interrupt. You thus need to implement OS_TASK_SW() to simulate an interrupt. Most processors provide either software interrupt or TRAP instructions to accomplish this. The ISR or trap handler (also called the exception handler) must vector to the assembly language function OSCtxSw() (see section 13.04.02).
For example, a port for an Intel or AMD 80x86 processor would use an INT instruction as shown in listing 13.7. The interrupt handler needs to vector to OSCtxSw(). You must determine how to do this with your compiler/processor.
#define OS_TASK_SW() asm INT 080H
A port for the Motorola 68HC11 processor would most likely uses the SWI instruction. Again, the SWI handler is OSCtxSw() . Finally, a port for a Motorola 680x0/CPU32 processor probably uses one of the 16 TRAP instructions. Of course, the selected TRAP handler is none other than OSCtxSw() .
Some processors, like the Zilog Z80, do not provide a software interrupt mechanism. In this case, you need to simulate the stack frame as closely to an interrupt stack frame as you can. OS_TASK_SW() would simply call OSCtxSw() instead of vectoring to it. The Z80 is a processor that has been ported to µC/OS and is thus portable to µC/OS-II.
OS_CPU_C.C
A µC/OS-II port requires that you write ten (10) fairly simple C functions:
OSTaskStkInit()
OSTaskCreateHook()
OSTaskDelHook()
OSTaskSwHook()
OSTaskIdleHook()
OSTaskStatHook()
OSTimeTickHook()
OSInitHookBegin()
OSInitHookEnd()
OSTCBInitHook()
The only required function is OSTaskStkInit(). The other nine functions must be declared but may not need to contain any code. Function prototypes as well as a reference manual type summary is provided at the end of this chapter.
OSTaskStkInit()
This function is called by OSTaskCreate() and OSTaskCreateExt() to initialize the stack frame of a task so that the stack looks as if an interrupt just occurred and all the processor registers were pushed onto that stack. The pseudo code for OSTaskStkInit() is shown in listing 13.8.
OS_STK *OSTaskStkInit (void  (*task)(void *pd),
                       void   *pdata,
                       OS_STK *ptos,
                       INT16U  opt);
{
    Simulate call to function with an argument (i.e., pdata);               (1)
    Simulate ISR vector;                                                    (2)
    Setup stack frame to contain desired initial values of all registers;   (3)
    Return new top-of-stack pointer to caller;                              (4)
}
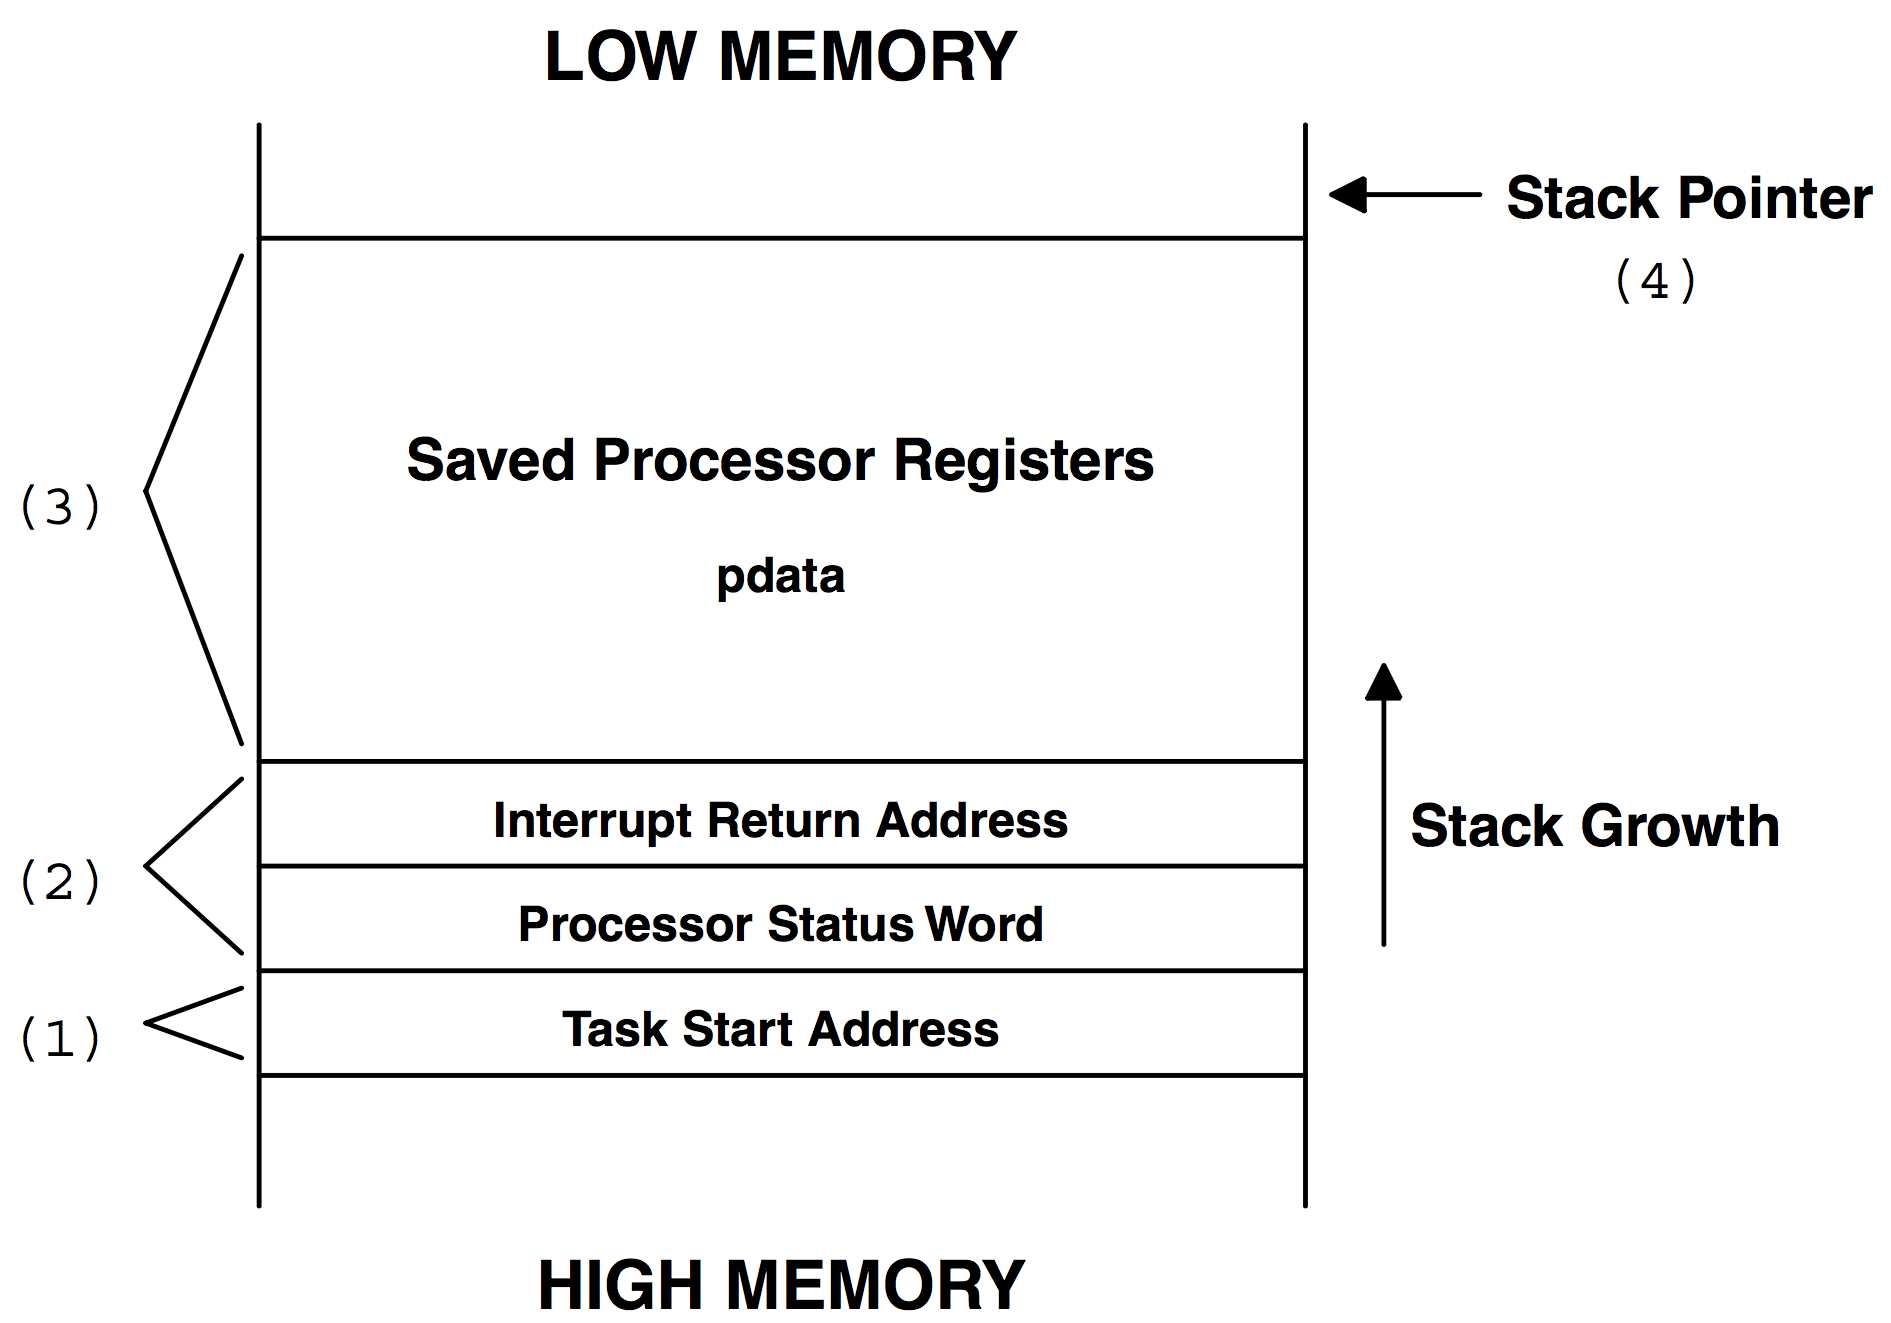
Figure 13.2 shows what OSTaskStkInit() needs to put on the stack of the task being created. Note that I assume a stack grows from high to low memory. The discussion that follows applies just as well for a stack growing in the opposite direction.
Figure 13.2 Stack frame initialization with pdata passed on the stack.
Listing 13.9 shows the function prototypes for OSTaskCreate(), OSTaskCreateExt() and OSTaskStkInit(). The arguments in bold font are passed from the create calls to OSTaskStkInit(). When OSTaskCreate() calls OSTaskStkInit(), it sets the opt argument to 0x0000 because OSTaskCreate() doesnt support additional options.
INT8U  OSTaskCreate (void  (*task)(void *pd),
                     Void   *pdata,
                     OS_STK *ptos,
                     INT8U   prio)

INT8U  OSTaskCreateExt (void   (*task)(void *pd),
                        void    *pdata,
                        OS_STK  *ptos,
                        INT8U    prio,
                        INT16U   id,
                        OS_STK  *pbos,
                        INT32U   stk_size,
                        void    *pext,
                        INT16U   opt)

OS_STK *OSTaskStkInit (void  (*task)(void *pd),
                       void   *pdata,
                       OS_STK *ptos,
                       INT16U  opt);

Recall that under µC/OS-II, a task is an infinite loop but otherwise looks just like any other C function. When the task is started by µC/OS-II, it receives an argument just as if it was called by another function as shown in Listing 13.10.
void MyTask (void *pdata)
{
    /* Do something with argument 'pdata' */
    for (;;) {
        /* Task code                      */
    }
}
If I were to call MyTask() from another function, the C compiler would push the argument onto the stack followed by the return address of the function calling MyTask() . OSTaskStkInit() needs to simulate this behavior. Some compilers actually pass pdata in one or more registers. Ill discuss this situation later.
The notes below apply both and simultaneously to Listing 13.8 and Figure 13.2. When reading each numbered note, refer to both the listing and the figure.
(1) F13.2
(1) L13.8 - Assuming pdata is pushed onto the stack, OSTaskStkInit() simply simulates this scenario and loads the stack accordingly.
(2) F13.2
(1) L13.8 - Unlike a C function call, the return address of the caller is unknown because your task was never really called (we are just trying to setup the stack frame of a task, as if the code was called). All OSTaskStkInit() knows about is the start address of your task (its passed as an argument). It turns out that you dont really need the return address because the task is not supposed to return to another function anyway.
(3) F13.2
(2) L13.8 - At this point, OSTaskStkInit() needs to put on the stack the registers that are automatically pushed by the processor when it recognizes and starts servicing an interrupt. Some processors stack all of its registers; others stack just a few. Generally speaking, a processor stacks at least the value of the program counter of the instruction to return to upon returning from an interrupt, and the processor status word. Obviously, you must match the order exactly.
(4) F13.2
(3) L13.8 - Next, OSTaskStkInit() need to put the rest of the processor registers on the stack. The stacking order depends on whether your processor gives you a choice or not. Some processors have one or more instructions that push many registers at once. You would have to emulate the stacking order of such instructions. For example, the Intel 80x86 has the PUSHA instruction, which pushes eight registers onto the stack. On the Motorola 68HC11 processor, all the registers are automatically pushed onto the stack during an interrupt response, so you would also need to match the stacking order.
(5) F13.2
(4) L13.8 - Once youve initialized the stack, OSTaskStkInit() needs to return the address where the stack pointer points after the stacking is complete. OSTaskCreate() or OSTaskCreateExt() takes this address and saves it in the task control block (OS_TCB). The processor documentation tells you whether the stack pointer should point to the next free location on the stack or the location of the last stored value. For example, on an Intel 80x86 processor, the stack pointer points to the last stored data, whereas on a Motorola 68HC11 processor, it points at the next free location.
Now its time to come back to the issue of what to do if your C compiler passes the pdata argument in registers instead of on the stack.
(1) Similar to the previous case, OSTaskStkInit() saves the task address onto the stack in order to simulate a call to your task code.
(2) Again, OSTaskStkInit() needs to put on the stack the registers that are automatically pushed by the processor when it recognizes and starts servicing an interrupt. Some processors stack all of its registers; others stack just a few. Generally speaking, a processor stacks at least the value of the program counter for the instruction to return to upon returning from an interrupt, and the processor status word. Obviously, you must match the order exactly.
(3) Next, OSTaskStkInit() need to put the rest of the processor registers on the stack. The stacking order depends on whether your processor gives you a choice or not. Some processors have one or more instructions that push many registers at once. You would have to emulate the stacking order of such instructions. Because the compiler passed arguments to a function in registers (at least some of them), you need to find out from the compiler documentation the register in which pdata is stored. pdata is placed on the stack in the same area you save the corresponding register.
(4) Once youve initialized the stack, OSTaskStkInit() needs to return the address where the stack pointer points after the stacking is complete. OSTaskCreate() or OSTaskCreateExt() takes this address and saves it in the task control block (OS_TCB). Again, the processor documentation tells you whether the stack pointer should point to the next free location on the stack or the location of the last stored value.
OSTaskCreateHook()
OSTaskCreateHook() is called by OS_TCBInit() whenever a task is created. This allows you or the user of your port to extend the functionality of µC/OS-II. OSTaskCreateHook() is called when µC/OS-II is done setting up most of the OS_TCB but before the OS_TCB is linked to the active task chain and before the task is made ready to run. Interrupts are enabled when this function is called.
When called, OSTaskCreateHook() receives a pointer to the OS_TCB of the task created and can thus access all of the structure elements. OSTaskCreateHook() has limited capability when the task is created with OSTaskCreate(). However, with OSTaskCreateExt(), you get access to a TCB extension pointer (OSTCBExtPtr) in OS_TCB that can be used to access additional data about the task, such as the contents of floating-point registers, MMU (Memory Management Unit) registers, task counters, and debug information. You may want to examine OS_TCBInit() to see exactly whats being done.
Note about OS_CPU_HOOKS_EN: The code for the hook functions (OS???Hook()) that are described in this and the following sections is generated from the file OS_CPU_C.C only if OS_CPU_HOOKS_EN is set to 1 in OS_CFG.H. The OS???Hook() functions are always needed and the #define constant OS_CPU_HOOKS_EN doesnt mean that the code will not be called. All OS_CPU_HOOKS_EN means is that the hook functions are in OS_CPU_C.C (when 1) or elsewhere, in another file (when 0). This allows the user of your port to redefine all the hook functions in a different file. Obviously, users of your port need access to the source to compile it with OS_CPU_HOOKS_EN set to 0 in order to prevent multiply defined symbols at link time. If you dont need to use hook functions because you dont intend to extend the functionality of µC/OS-II through this mechanism then you can simply leave the function bodies empty. Again, µC/OS-II always expects that the hook functions exist (i.e., they must ALWAYS be declared somewhere).
OSTaskDelHook()
OSTaskDelHook() is called by OSTaskDel() after removing the task from either the ready list or a wait list (if the task was waiting for an event to occur). It is called before unlinking the task from µC/OS-IIs internal linked list of active tasks. When called, OSTaskDelHook() receives a pointer to the task control block (OS_TCB) of the task being deleted and can thus access all of the structure members. OSTaskDelHook() can see if a TCB extension has been created (a non-NULL pointer) and is thus responsible for performing cleanup operations. OSTaskDelHook() is called with interrupts disabled which means that your OSTaskDelHook() can affect interrupt latency if its too long. You may want to study OSTaskDel() and see exactly what is accomplised before OSTaskDelHook() is called.
OSTaskSwHook()
OSTaskSwHook() is called whenever a task switch occurs. This happens whether the task switch is performed by OSCtxSw() or OSIntCtxSw() (see OS_CPU_A.ASM). OSTaskSwHook() can access OSTCBCur and OSTCBHighRdy directly because they are global variables. OSTCBCur points to the OS_TCB of the task being switched out, and OSTCBHighRdy points to the OS_TCB of the new task. Note that interrupts are always disabled during the call to OSTaskSwHook(), so you should keep additional code to a minimum since it will affect interrupt latency. OSTaskSwHook() has no arguments and is not expected to return anything.
OSTaskStatHook()
OSTaskStatHook() is called once every second by OSTaskStat(). You can thus extend the statistics capability with OSTaskStatHook(). For instance, you can keep track of and display the execution time of each task, the percentage of the CPU that is used by each task, how often each task executes, and more. OSTaskStatHook() has no arguments and is not expected to return anything. You may want to study OS_TaskStat().
OSTimeTickHook()
OSTaskTimeHook() is called by OSTimeTick() at every system tick. In fact, OSTimeTickHook() is called before a tick is actually processed by µC/OS-II to give your port or application first claim of the tick. OSTimeTickHook() has no arguments and is not expected to return anything.
OSTCBInitHook()
OSTCBInitHook() is called by OS_TCBInit() immediately before calling OSTaskCreateHook() which is also called by OS_TCBInit(). I did this so that you could initialize OS_TCB related data with OSTCBInitHook() and task related data with OSTaskCreateHook() (there may be a difference). Its up to you to decide whether you need to populate both of these functions. Like OSTaskCreateHook(), OSTCBInitHook() receives a pointer to the newly created tasks OS_TCB after initializing most of the field, but before linking the OS_TCB to the chain of created tasks. You may want to examine OS_TCBInit().
OSTaskIdleHook()
Many microprocessors allow you to execute instructions that brings the CPU into a low-power mode. The CPU exits low-power mode when it receives an interrupt. OSTaskIdleHook() is called by OS_TaskIdle() and, as shown in Listing 13.11, can be made to use this CPU feature.
void  OS_TaskIdle (void *pdata)
{
#if OS_CRITICAL_METHOD == 3
    OS_CPU_SR  cpu_sr;
#endif


    pdata = pdata;
    for (;;) {
        OS_ENTER_CRITICAL();
        OSIdleCtr++;                                      (1)
        OS_EXIT_CRITICAL();
        OSTaskIdleHook();                                 (2)
    }
}

void  OSTaskIdleHook (void)
{
    asm( STOP);                                         (3)
    /* Interrupt received and serviced */                 (4)
}
(1) As you know, OS_TaskIdle() is executed whenever no other task is ready to run. OS_TaskIdle() increments the idle counter, OSIdleCtr.
(2) Next OS_TaskIdle() calls the hook function OSTaskIdleHook() that you would declare in the port file OS_CPU_C.C.
(3) OSTaskIdleHook() immediately invokes the CPU instruction to bring the CPU in low-power mode. I assumed, for sake of illustration, that your compiler supports inline assembly language and that the instruction to execute is called STOP. Other compilers may not allow you to do inline assembly language and, in those cases, you could declare OSTaskIdleHook() in the assembly language file OS_CPU_A.ASM but make sure you include a return from the call. Also, the instruction to bring the CPU in low-power mode may be called something else.
(4) When an interrupt occurs, the CPU exits low-power mode and processes the ISR (Interrupt Service Routine). The ISR signals a higher priority task which executes upon completion of the ISR because the ISR calls OSIntExit(). When all tasks are again waiting for events to occur, µC/OS-II switches back to the idle task immediately after item L13.9(4) and OSTaskIdleHook() returns to OS_TaskIdle() and the same process repeats.
You could also use OSTaskIdleHook() to blink an LED (Light Emitting Diode) which could be used as an indication of how busy the CPU is. A dim LED would indicate a very busy CPU while a bright LED indicates a lightly loaded CPU.
OSInitHookBegin()
OSInitHookBegin() is called immediately upon entering OSInit(). The reason I added this function is to encapsulate OS related initialization within OSInit(). This allows you to extend OSInit() with your own port specific code. The user of your port still only sees OSInit() and thus makes the code cleaner.
OSInitHookEnd()
OSInitHookEnd() is similar to OSInitHookBegin() except that the hook is called at the end of OSInit() just before returning to OSInit()s caller. The reason is the same as above and you can see an example of the use of OSInitHookEnd() in Chapter 15, 80x86 with Floating-Point.
OS_CPU_A.ASM
A µC/OS-II port requires that you write four assembly language functions:
OSStartHighRdy()
OSCtxSw()
OSIntCtxSw()
OSTickISR()
If your compiler supports in-line assembly language code, you could actually place these functions in OS_CPU_C.C instead of having a separate assembly language file.
OSStartHighRdy()
This function is called by OSStart() to start the highest priority task ready to run. The pseudo-code for this function is shown in Listing 13.12. You need to convert this pseudo-code to assembly language.
void OSStartHighRdy (void)
{
    Call user definable OSTaskSwHook();                               (1)
    OSRunning = TRUE;                                                 (2)
    Get the stack pointer of the task to resume:                      (3)
        Stack pointer = OSTCBHighRdy->OSTCBStkPtr;

    Restore all processor registers from the new task's stack;        (4)
    Execute a return from interrupt instruction;                      (5)
}
(1) OSStartHighRdy() must call OSTaskSwHook(). However, OSStartHighRdy() only does half a context switch — you are only restoring the registers of the highest priority task and NOT saving the register of a task. OSTaskSwHook() can examine OSRunning to tell it whether OSTaskSwHook() was called from OSStartHighRdy() (OSRunning is FALSE) or from a regular context switch (OSRunning is TRUE).
(2) OSStartHighRdy() sets OSRunning to TRUE before the highest priority task is restored, but after calling OSTaskSwHook().
You should note that I should have placed the previous two statements in OSStart() instead of requiring that they be placed in OSStartHighRdy() because they dont need to be done in assembly language. Unfortunately, I didnt notice this fact when I first wrote OSStart(). If I were to change OSStart() at this point, a large number of ports may not work properly. I have thus decided to leave these statements in OSStartHighRdy() in order to avoid a lot of e-mails!
(3) OSStartHighRdy() then needs to load the stack pointer of the CPU with the top-of-stack pointer of the highest priority task. OSStartHighRdy() assumes that OSTCBHighRdy points to the task control block of the task with the highest priority. To simplify things, the stack pointer is always stored at the beginning of the task control block (i.e., its OS_TCB). In other words, the stack pointer of the task to resume is always stored at offset 0 in the OS_TCB.
(4) In µC/OS-II, the stack frame for a ready task always looks as if an interrupt has just occurred and all processor registers were saved onto it. To run the highest priority task, all you need to do is restore all processor registers from the tasks stack in the proper order and execute a return from interrupt. In this step, OSStartHighRdy()retrieves the contents of all the CPU registers from the stack. Its important to pop the registers in the reverse order from how they were placed onto the stack by OSTaskStkInit() (see Section 13.??, OSTaskStkInit()).
(5) The last step is to execute a return from interrupt instruction which causes the CPU to retrieve the program counter and possibly the CPU flags register (also called the status register) from the stack. This causes the CPU to resume execution at the first instruction of the highest priority task.
Before you can call OSStart(), however, you must have created at least one of your tasks [see OSTaskCreate() and OSTaskCreateExt()].
OSCtxSw()
A task-level context switch is accomplished by issuing a software interrupt instruction or, depending on the processor, executing a TRAP instruction. The interrupt service routine, trap, or exception handler must vector to OSCtxSw().
The sequence of events that leads µC/OS-II to vector to OSCtxSw() begins when the current task calls a service provided by µC/OS-II, which causes a higher priority task to be ready to run. At the end of the service call, µC/OS-II calls OS_Sched(), which concludes that the current task is no longer the most important task to run. OS_Sched() loads the address of the highest priority task into OSTCBHighRdy then executes the software interrupt or trap instruction by invoking the macro OS_TASK_SW(). Note that the variable OSTCBCur already contains a pointer to the current tasks task control block, OS_TCB. The software interrupt instruction (or TRAP) forces some of the processor registers (most likely the return address and the processors status word) onto the current tasks stack, then the processor vectors to OSCtxSw().
The pseudocode for OSCtxSw() is shown in Listing 13.13. This code must be written in assembly language because you cannot access CPU registers directly from C. Note that interrupts are disabled during OSCtxSw() and also during execution of the user-definable function OSTaskSwHook(). When OSCtxSw() is invoked, it is assumed that the processors program counter (PC) and possibly the flag register (or status register) are pushed onto the stack by the software interrupt instruction which is invoked by the OS_TASK_SW() macro.
void OSCtxSw(void)
{
    Save processor registers;                                                (1)
    Save the current tasks stack pointer into the current tasks OS_TCB:      (2)
        OSTCBCur->OSTCBStkPtr = Stack pointer;
    Call user definable OSTaskSwHook();                                      (3)
    OSTCBCur  = OSTCBHighRdy;                                                (4)
    OSPrioCur = OSPrioHighRdy;                                               (5)
    Get the stack pointer of the task to resume:                             (6)
        Stack pointer = OSTCBHighRdy->OSTCBStkPtr;
    Restore all processor registers from the new tasks stack;                (7)
    Execute a return from interrupt instruction;                             (8)
}
(1) OSCtxSw() saves all the processor registers (except the ones already saved by the software interrupt) in the SAME order as they are placed on the stack by OSTaskStkInit().
(2) Once all CPU registers are on the stack of the task to suspend, OSCtxSw() saves the stack pointer into the tasks OS_TCB.
(3) OSCtxSw() calls OSTaskSwHook() in case your port needs to extend the functionality of a context switch. Note that OSTaskSwHook() is ALWAYS called whether this function is declared in OS_CPU_C.C or elsewhere.
(4) OSCtxSw() then needs to make the pointer to the current OS_TCB point to the OS_TCB of the task being resumed. In other words, the new task will become the current task.
(5) OSCtxSw() needs to copy the new tasks priority into the current task priority.
(6) The new tasks stack pointer is then retrieved from the new tasks OS_TCB.
(7) OSCtxSw() then needs to restore the value of the CPU registers for the task that is being resumed. You must restore the registers in exactly the reverse order as they were saved. For example, if your processor has four registers called R1, R2, R3 and R4 and you saved them in that order then you must retrieve them starting from R4 and ending with R1.
(8) Since the value of the high priority tasks program counter (and possibly the status register) are still on the stack, a return from interrupt would cause the program counter and status register to be popped off the stack and loaded into the CPU. This causes your task code to be resumed.
void main(void)
{
    .
    .
    OSInit();               /* Initialize μC/OS-II                 */
    .
    .
    /* Application initialization code ...                         */
    /* ... Create at least on task by calling OSTaskCreate()       */
    .
    .
    Enable TICKER interrupts; /* DO NOT DO THIS HERE!!!            */
    .
    .
    OSStart();                /* Start multitasking                */
}
OSTickISR()
µC/OS-II requires you to provide a periodic time source to keep track of time delays and timeouts. A tick should occur between 10 and 100 times per second, or Hertz. To accomplish this, either dedicate a hardware timer or obtain 50/60Hz from an AC power line.
You must enable ticker interrupts after multitasking has started; that is, after calling OSStart(). Note that you really cant do this because OSStart() never returns. However, you can and should initialize and tick interrupts in the first task that executes following a call to OSStart(). This would of course be the highest priority task that you would have created before calling OSStart(). A common mistake is to enable ticker interrupts between calling OSInit() and OSStart(), as shown in Listing 13.14. This is a problem because the tick interrupt could be serviced before µC/OS-II starts the first task and, at that point, µC/OS-II is in an unknown state and your application could crash.
The pseudocode for the tick ISR is shown in Listing 13.15. This code must be written in assembly language because you cannot access CPU registers directly from C.
void OSTickISR(void)
{
   Save processor registers;                                     (1)
   Call OSIntEnter() or increment OSIntNesting;                  (2)
   if (OSIntNesting == 1) {                                      (3)
      OSTCBCur->OSTCBStkPtr = Stack Pointer;
   }
   Clear interrupting device;                                    (4)
   Re-enable interrupts (optional);                              (5)
   Call OSTimeTick();                                            (6)
   Call OSIntExit();                                             (7)
   Restore processor registers;                                  (8)
   Execute a return from interrupt instruction;                  (9)
}
(1) The tick ISR (as with any ISR) needs to save all the CPU registers onto the current tasks stack. Of course, they need to be saved in the same order as they are placed in OSTaskStkInit().
(2) It is assumed that interrupts are disabled at this point so you can directly increment OSIntNesting without fear of data corruption from another ISR. In the past, I recommended that you called OSIntEnter() which handles the increment. At the time, I wanted to encapsulate the increment in case I needed to do more processing at the beginning of the ISR. It turns out that I added a boundary check in OSIntEnter() to ensure that interrupt nesting never exceeded 255 levels. If dont expect to nest this deep, you can increment OSIntNesting without this boundary check. If you want to be safe, simply call OSIntEnter(). However, calling OSIntEnter() adds overhead to the ISR. Its up to you to decide which way you want to implement your port.
(3) The tick ISR then needs to check the value of OSIntNesting and if its one, you need to save the contents of the stack pointer into the current tasks OS_TCB. This step has been added in version 2.51 and although it complicates the ISR slightly, it does make a port more compiler independent.
(4) Depending on the source of the interrupt, the interrupting device may need to be cleared to acknowledge the interrupt.
(5) You may want to re-enable interrupts at this point in order to allow higher priority interrupts to be recognized. This is an optional step because you may not want to allow nested interrupts because they consume stack space.
(6) OSTickISR() must call OSTimeTick() which is responsible for maintaining µC/OS-IIs internal timers. The timers allow tasks to be suspended for a certain amount of time or allow timeouts on PEND-type calls.
(7) Because we are done servicing this ISR, we need to call OSIntExit(). As you probably remember, OSIntExit() will determine whether a higher priority task has been made ready to run because of this ISR. If a higher priority task is ready to run, OSIntExit() will not return to the interrupted task but instead, context switch to this higher priority task.
(8) If there is no higher priority task then OSIntExit() returns, and we simply restore the CPU registers from the values stacked at the beginning of the ISR. Again, the registers must be restored in the reverse order.
(9) OSTickISR() needs to execute a return from interrupt in order to resume execution of the interrupted task.
OSIntCtxSw()
OSIntCtxSw() is called by OSIntExit() to perform a context switch from an ISR. Because OSIntCtxSw() is called from an ISR, it is assumed that all the processor registers are properly saved onto the interrupted tasks stack (see section 13.05.03, OSTickISR() ).
The pseudocode for OSIntCtxSw() is shown in Listing 13.16. This code must be written in assembly language because you cannot access CPU registers directly from C. If your C compiler supports inline assembly, put the code for OSIntCtxSw() in OS_CPU_C.C instead of OS_CPU_A.ASM. You should note that this is the pseudocode for V2.51 (and higher) because prior to V2.51, OSIntCtxSw() required a few extra steps. If you have a port that was done for a version prior to V2.51, I highly recommend that you change it to match the algorithm shown in Listing 13.16.
A lot of the code is identical to OSCtxSw() except that we dont save the CPU registers onto the current task because thats already done by the ISR. In fact, you can reduce the amount of code in the port by jumping to the appropriate section of code in OSCtxSw() if you want. Because of the similarity between OSCtxSw() and OSIntCtxSw(), once you figure out how to do OSCtxSw(), you have automatically figured out how to do OSIntCtxSw()!
void OSIntCtxSw(void)
{
    Call user-definable OSTaskSwHook();
    OSTCBCur  = OSTCBHighRdy;
    OSPrioCur = OSPrioHighRdy;
    Get the stack pointer of the task to resume:
        Stack pointer = OSTCBHighRdy->OSTCBStkPtr;
    Restore all processor registers from the new tasks stack;
    Execute a return from interrupt instruction;
}
Listing 13.17 shows the pseudocode for OSIntCtxSw() for a port made for a version of µC/OS-II prior to V2.51. You will recognize such a port because of the added two items before calling OSTaskSwHook() : L13.17(1) and L13.17(2). ISRs for such a port also would not have the statements shown in L13.15(3) to save the stack pointer into the OS_TCB of the interrupted task. Because of this, OSIntCtxSw() had to do these operations (again, L13.17(1) and L13.17(2)). However, because the stack pointer was not pointing to the proper stack frame location (when OSIntCtxSw() starts executing, the return address of OSIntExit() and OSIntCtxSw() were placed on the stack by the calls), the stack pointer needed to be adjusted. The solution was to add an offset to the stack pointer. The value of this offset was dependent on the compiler options and generated more e-mail than I expected or cared for. One of those e-mail was from a clever individual named Nicolas Pinault which pointed out how this stack adjustment business could all be avoided as previously described. Because of Nicolas, µC/OS-II is no longer dependent on compiler options. Thanks again Nicolas!
void OSIntCtxSw(void)
{
    Adjust the stack pointer to remove calls to:                            (1)
        OSIntExit();
        OSIntCtxSw();
    Save the current tasks stack pointer into the current tasks OS_TCB:   (2)
        OSTCBCur->OSTCBStkPtr = Stack Pointer;
    Call user-definable OSTaskSwHook();
    OSTCBCur  = OSTCBHighRdy;
    OSPrioCur = OSPrioHighRdy;
    Get the stack pointer of the task to resume:
        Stack pointer = OSTCBHighRdy->OSTCBStkPtr;
    Restore all processor registers from the new tasks stack;
    Execute a return from interrupt instruction;
}
Testing a Port
Once you have a port of µC/OS-II for your processor, you need to verify its operation. This is probably the most complicated part of writing a port. You should test your port without application code. In other words, test the operations of the kernel by itself. There are two reasons to do this. First, you dont want to complicate things anymore than they need to be. Second, if something doesnt work, you know that the problem lies in the port as opposed to your application. Start with a couple of simple tasks and only the ticker interrupt service routine. Once you get multitasking going, its quite simple to add your application tasks.
There are a number of techniques you could use to test your port depending on your level of experience with embedded systems and processors in general. When I write a port, I generally follow the following four steps:
- Ensure that the code compiles, assembles and links
- Verify
OSTaskStkInit()andOSStartHighRdy() - Verify
OSCtxSw() - Verify
OSIntCtxSw()andOSTickISR()
Ensure that the Code Compiles, Assembles and Links
Once you complete the port, you need to compile, assemble and link it along with the µC/OS-II processor independent code. This step is obviously compiler specific and you will need to consult your compiler documentation to determine how to do this.
I generally setup a simple test directory as follows:
\SOFTWARE\uCOS-II\processor\compiler\TEST
where processor is the name of the processor or microcontroller for which you did the port, and compiler is the name of the compiler you used.
Table 13.2 shows the directories you will need to work with, along with the files found in those directories. In the TEST directory, you should have at least three file: TEST.C, INCLUDES.H and OS_CFG.H. Depending on the processor used, you may also need to have an interrupt vector table which I assumed would be called VECTORS.C but, it could certainly be called something else.
The TEST directory could also contain a MAKEFILE which specifies compiler, assembler and linker directives to build your project. A MAKEFILE assumes, of course, that you use a make utility. If your compiler provides an IDE (Integrated Development Environment), you may not have a MAKEFILE but instead, you could have project files which are specific to the IDE.
The port you did (refer to section 13.01) should be found in the following directory:
\SOFTWARE\uCOS-II\processor\compiler
Table 13.2, Files needed to test a Port
| Directory | File |
|---|---|
\SOFTWARE\uCOS-II\processor\compiler\TEST | TEST.C |
OS_CFG.H | |
INCLUDES.H | |
VECTORS.C | |
MAKEFILE or IDE project file(s) | |
\SOFTWARE\uCOS-II\processor\compiler | OS_CPU_A.ASM |
OS_CPU_C.C | |
OS_CPU.H | |
\SOFTWARE\uCOS-II\SOURCE | OS_CORE.C |
OS_FLAG.C | |
OS_MBOX.C | |
OS_MEM.C | |
OS_MUTEX.C | |
OS_Q.C | |
OS_SEM.C | |
OS_TASK.C | |
OS_TIME.C | |
uCOS_II.H | |
uCOS_II.H |
Listing 13.18 shows the contents of a typical INCLUDES.H. STRING.H is needed because OSTaskCreateExt() uses the ANSI C function memset() to initialize the stack of a task. The other standard C header files (STDIO.H, CTYPE.H and STDLIB.H) are not actually used by µC/OS-II but are included in case your application needs them.
#include    <stdio.h>
#include    <string.h>
#include    <ctype.h>
#include    <stdlib.h>

#include    "os_cpu.h"
#include    "os_cfg.h"
#include    "ucos_ii.h"
Listing 13.19 shows the content of OS_CFG.H which was setup to enable ALL the features of µC/OS-II. You can find a similar file in the \SOFTWARE\uCOS-II\EX1_x86L\BC45\SOURCE directory of the companion CD so that you can use it as a starting point instead of typing an OS_CFG.H from scratch.
                                       /* ---------------------- MISCELLANEOUS ----------------------- */
#define OS_ARG_CHK_EN             1    /* Enable (1) or Disable (0) argument checking                  */

#define OS_CPU_HOOKS_EN           1    /* uC/OS-II hooks are found in the processor port files         */

#define OS_LOWEST_PRIO           63    /* Defines the lowest priority that can be assigned ...         */
                                       /* ... MUST NEVER be higher than 63!                            */

#define OS_MAX_EVENTS            20    /* Max. number of event control blocks in your application ...  */
                                       /* ... MUST be > 0                                              */
#define OS_MAX_FLAGS             10    /* Max. number of Event Flag Groups    in your application ...  */
                                       /* ... MUST be > 0                                              */
#define OS_MAX_MEM_PART          10    /* Max. number of memory partitions ...                         */
                                       /* ... MUST be > 0                                              */
#define OS_MAX_QS                10    /* Max. number of queue control blocks in your application ...  */
                                       /* ... MUST be > 0                                              */
#define OS_MAX_TASKS             63    /* Max. number of tasks in your application ...                 */
                                       /* ... MUST be >= 2                                             */

#define OS_SCHED_LOCK_EN          1    /*     Include code for OSSchedLock() and OSSchedUnlock()       */

#define OS_TASK_IDLE_STK_SIZE   512    /* Idle task stack size (# of OS_STK wide entries)              */

#define OS_TASK_STAT_EN           1    /* Enable (1) or Disable(0) the statistics task                 */
#define OS_TASK_STAT_STK_SIZE   512    /* Statistics task stack size (# of OS_STK wide entries)        */

#define OS_TICKS_PER_SEC        200    /* Set the number of ticks in one second                        */


                                       /* ----------------------- EVENT FLAGS ------------------------ */
#define OS_FLAG_EN                1    /* Enable (1) or Disable (0) code generation for EVENT FLAGS    */
#define OS_FLAG_WAIT_CLR_EN       1    /* Include code for Wait on Clear EVENT FLAGS                   */
#define OS_FLAG_ACCEPT_EN         1    /*     Include code for OSFlagAccept()                          */
#define OS_FLAG_DEL_EN            1    /*     Include code for OSFlagDel()                             */
#define OS_FLAG_QUERY_EN          1    /*     Include code for OSFlagQuery()                           */


                                       /* -------------------- MESSAGE MAILBOXES --------------------- */
#define OS_MBOX_EN                1    /* Enable (1) or Disable (0) code generation for MAILBOXES      */
#define OS_MBOX_ACCEPT_EN         1    /*     Include code for OSMboxAccept()                          */
#define OS_MBOX_DEL_EN            1    /*     Include code for OSMboxDel()                             */
#define OS_MBOX_POST_EN           1    /*     Include code for OSMboxPost()                            */
#define OS_MBOX_POST_OPT_EN       1    /*     Include code for OSMboxPostOpt()                         */
#define OS_MBOX_QUERY_EN          1    /*     Include code for OSMboxQuery()                           */


                                       /* --------------------- MEMORY MANAGEMENT -------------------- */
#define OS_MEM_EN                 1    /* Enable (1) or Disable (0) code generation for MEMORY MANAGER */
#define OS_MEM_QUERY_EN           1    /*     Include code for OSMemQuery()                            */


                                       /* ---------------- MUTUAL EXCLUSION SEMAPHORES --------------- */
#define OS_MUTEX_EN               1    /* Enable (1) or Disable (0) code generation for MUTEX          */
#define OS_MUTEX_ACCEPT_EN        1    /*     Include code for OSMutexAccept()                         */
#define OS_MUTEX_DEL_EN           1    /*     Include code for OSMutexDel()                            */
#define OS_MUTEX_QUERY_EN         1    /*     Include code for OSMutexQuery()                          */


                                       /* ---------------------- MESSAGE QUEUES ---------------------- */
#define OS_Q_EN                   1    /* Enable (1) or Disable (0) code generation for QUEUES         */
#define OS_Q_ACCEPT_EN            1    /*     Include code for OSQAccept()                             */
#define OS_Q_DEL_EN               1    /*     Include code for OSQDel()                                */
#define OS_Q_FLUSH_EN             1    /*     Include code for OSQFlush()                              */
#define OS_Q_POST_EN              1    /*     Include code for OSQPost()                               */
#define OS_Q_POST_FRONT_EN        1    /*     Include code for OSQPostFront()                          */
#define OS_Q_POST_OPT_EN          1    /*     Include code for OSQPostOpt()                            */
#define OS_Q_QUERY_EN             1    /*     Include code for OSQQuery()                              */


                                       /* ------------------------ SEMAPHORES ------------------------ */
#define OS_SEM_EN                 1    /* Enable (1) or Disable (0) code generation for SEMAPHORES     */
#define OS_SEM_ACCEPT_EN          1    /*    Include code for OSSemAccept()                            */
#define OS_SEM_DEL_EN             1    /*    Include code for OSSemDel()                               */
#define OS_SEM_QUERY_EN           1    /*    Include code for OSSemQuery()                             */


                                       /* --------------------- TASK MANAGEMENT ---------------------- */
#define OS_TASK_CHANGE_PRIO_EN    1    /*     Include code for OSTaskChangePrio()                      */
#define OS_TASK_CREATE_EN         1    /*     Include code for OSTaskCreate()                          */
#define OS_TASK_CREATE_EXT_EN     1    /*     Include code for OSTaskCreateExt()                       */
#define OS_TASK_DEL_EN            1    /*     Include code for OSTaskDel()                             */
#define OS_TASK_SUSPEND_EN        1    /*     Include code for OSTaskSuspend() and OSTaskResume()      */
#define OS_TASK_QUERY_EN          1    /*     Include code for OSTaskQuery()                           */


                                       /* --------------------- TIME MANAGEMENT ---------------------- */
#define OS_TIME_DLY_HMSM_EN       1    /*     Include code for OSTimeDlyHMSM()                         */
#define OS_TIME_DLY_RESUME_EN     1    /*     Include code for OSTimeDlyResume()                       */
#define OS_TIME_GET_SET_EN        1    /*     Include code for OSTimeGet() and OSTimeSet()             */


typedef INT16U             OS_FLAGS;   /* Date type for event flag bits (8, 16 or 32 bits)             */
Listing 13.20 shows the contents of a simple TEST.C file that you can start with to prove your compile process. For this first step, there is no need for any more code because all we are trying to accomplish is a build. At this point, its up to you to resolve any compiler, assembler and/or linker errors. You may also get some warnings and you will need to determine whether the warnings are severe enough to be a problem.
#include    "includes.h"

void  main (void)
{
    OSInit();
    OSStart();
}
Verify OSTaskStkInit() and OSStartHighRdy()
Once you achieved a successful build, you are actually ready to start testing your port. As the title of this section suggest, this step will verify the proper operation of OSTaskStkInit() and OSStartHighRdy().
Testing with a source level debugger
If you have a source level debugger, you should be able to verify this step fairly quickly. I assume you already know how to use your debugger.
Start by modifying OS_CFG.H to disable the statistic task by setting OS_TASK_STAT_EN to 0. Because your TEST.C file (see Listing 13.20) doesnt create any application task, the only task created is the µC/OS-II idle task: OS_TaskIdle(). We will step into the code until µC/OS-II switches to OS_TaskIdle().
You should load the code into the debugger and start single stepping into main(). You should step over the function OSInit() and then step into the code for OSStart() (shown in listing 13.21). Step through the code until you reach the call to OSStartHighRdy() (the last statement in OSStart()) then step into the code for OSStartHighRdy(). At this point, your debugger should switch to assembly language mode since OSStartHighRdy() is written in assembly language. This is the code you wrote to start the first task and because we didnt create any other task than OS_TaskIdle(), OSStartHighRdy() should start this task.
void  OSStart (void)
{
    INT8U y;
    INT8U x;


    if (OSRunning == FALSE) {
        y             = OSUnMapTbl[OSRdyGrp];
        x             = OSUnMapTbl[OSRdyTbl[y]];
        OSPrioHighRdy = (INT8U)((y << 3) + x);
        OSPrioCur     = OSPrioHighRdy;
        OSTCBHighRdy  = OSTCBPrioTbl[OSPrioHighRdy];
        OSTCBCur      = OSTCBHighRdy;
        OSStartHighRdy();
    }
}
Step through your code and verify that it does what you expect. Specifically, OSStartHighRdy() should start populating CPU registers in the reverse order that they were placed onto the task stack by OSTaskStkInit() (see OS_CPU_C.C ). If this doesnt happen, you most likely misaligned the stack pointer. In this case, you will have to correct OSTaskStkInit() accordingly. The last instruction in OSStartHighRdy() should be a return from interrupt and, as soon as you execute that code, your debugger should be positioned at the first instruction of OS_TaskIdle() . If this doesnt happen, you may not have placed the proper start address of the task onto the task stack and, you will most likely have to correct this in OSTaskStkInit() . If your debugger ends up in OS_TaskIdle() and you can execute a few times through the infinite loop, you are done with this step and have succesfully verified OSTaskStkInit() and OSStartHighRdy() .
GO/noGO Testing
If you dont have access to a source level debugger but have an LED (Light Emitting Diode) on your target system, you can write a GO/noGO test. What we will do is start by turning OFF the LED and if OSTaskStkInit() and OSStartHighRdy() works, the LED will be turned ON by the idle task. In fact, the LED will be turned ON and OFF very quickly and will appear to always be ON. If you have an oscilloscope, you will be able to confirm that the LED is blinking at a roughly 50% duty cycle.
For this test, you will need to temporarily modify three files OS_CFG.H, OS_CPU_C.C and TEST.C.
In OS_CFG.H, you need to disable the statistic task by setting OS_TASK_STAT_EN to 0. In TEST.C, you will need to add code to turn OFF the LED as shown in Listing 13.22. In OS_CPU_C.C, you need to modify OSTaskIdleHook() to toggle the LED as shown in the pseudocode of Listing 13.23.
The next step is to load the code in your target system and run it. If the LED doesnt toggle, youll need to find out whats wrong in either OSTaskStkInit() or OSStartHighRdy(). With such limited and primitive tools, the best you can do is carefully inspect your code until you find what you did wrong!
#include    includes.h

void  main (void)
{
    OSInit();
    Turn OFF LED;
    OSStart();
}
void  OSTaskIdleHook (void)
{
    if (LED is ON) {              /* Toggle LED                 */
        Turn OFF LED;
    } else {
        Turn ON LED;
    }
}
Verify OSCtxSw()
This should be an easy step because in the previous step, we verified that the stack frame of a task is correctly initialized by OSTaskStkInit(). For this test, we will create an application task and force a context switch back to the idle task. For this test, you need to ensure that you have correctly setup the software interrupt or TRAP to vector to OSCtxSw().
Testing with a Source Level Debugger
Start by modifying main() in TEST.C as shown in Listing 13.24. For sake of discussion, I decided to assume that the stack of your processor grows downwards from high to low memory and that 100 entries is sufficient stack space for the test task. Of course, you should modify this code according to your own processor requirements.
#include    "includes.h"

OS_STK  TestTaskStk[100];

void  main (void)
{
    OSInit();
    OSTaskCreate(TestTask, (void *)0, &TestTaskStk[99], 0);        (1)
    OSStart();
}


void  TestTask (void *pdata)                                       (2)
{
    pdata = pdata;
    while (1) {
        OSTimeDly(1);                                              (3)
    }
}
(1) We will create a high priority task. I decided to use priority level 0 but you can use anything below OS_LOWEST_PRIO (see _CFG.H).
(2) Since we proved in 13.06.02 that OSStartHighRdy() works, µC/OS-II should start executing TestTask() as its first task instead of the idle task. You can step through the code until you get to the beginning of TestTask().
(3) TestTask() enters an infinite loop which continuously calls OSTimeDly(1). In other words, TestTask() doesnt really do anything except wait for time to expire. Because we didnt enable interrupts nor did we start the clock tick, OSTimeDly(1) will never return to TestTask()!
You can now step into OSTimeDly(). The function OSTimeDly() will call OS_Sched() and OS_Sched() will in turn calls the assembly language function OSCtxSw(). In most cases, this is accomplished through a TRAP or software interrupt mechanism. In other words, if you setup the software interrupt or TRAP correctly, this instruction should cause the CPU to start executing OSCtxSw(). You can step through the code for OSCtxSw() and see the registers of TestTask() be saved onto its stack and the value of the registers for OS_TaskIdle() be loaded into the CPU. When the return from interrupt is executed (for the software interrupt or TRAP), you should be in OS_TaskIdle()!
If OSCtxSw() doesnt bring you into OS_TaskIdle() you will need to find out why and make the necessary corrections to OSCtxSw().
GO/noGO Testing
Modify main() in TEST.C as shown in Listing 13.25. I decided to assume that the stack of your processor grows downwards from high to low memory and that 100 entries is sufficient stack space for the test task.
#include    "includes.h"

OS_STK  TestTaskStk[100];

void  main (void)
{
    OSInit();
    Turn OFF LED;                                                  (1)
    OSTaskCreate(TestTask, (void *)0, &TestTaskStk[99], 0);        (2)
    OSStart();
}


void  TestTask (void *pdata)                                       (3)
{
    pdata = pdata;
    while (1) {
        OSTimeDly(1);                                              (4)
    }
}
(1) You need to turn OFF the LED before you run the rest of the code so that if the test fails, hopefully the LED will be turned OFF. I say hopefully because the processor could crash and stiff turn the LED ON. However, if OSCtxSw() is written correctly, the LED should toggle very quickly and you can thus verify this with an oscilloscope.
(2) We will create a high priority task. I decided to use priority level 0 but you can use anything below OS_LOWEST_PRIO (see OS_CFG.H).
(3) Since we proved in 13.06.02 that OSStartHighRdy() works, µC/OS-II should start executing TestTask() as its first task instead of the idle task.
(4) TestTask() enters an infinite loop which continuously calls OSTimeDly(1). In other words, TestTask() doesnt really do anything except wait for time to expire. Because we didnt enable interrupts nor did we start the clock tick, OSTimeDly(1) will never return to TestTask()! When OSTimeDly(1) is called, a context switch to the idle task should occur (if OSCtxSw() is properly written) and you should get the LED to blink very quickly. In fact, it will blink so fast that it will appear to be always ON. You should verify that it blinks using an oscilloscope (if one is available). If the LED is not blinking or is OFF, you will need to find out why and make the necessary corrections to OSCtxSw().
Verify OSIntCtxSw() and OSTickISR()
This should be an easy step because OSIntCtxSw() is similar but simpler than OSCtxSw(). In fact, most of the code for OSIntCtxSw() can be borrowed from OSCtxSw(). For this test, you will need to setup an interrupt vector for the clock tick ISR. We will then initialize the clock tick and enable interrupts.
Start by modifying main() in TEST.C as shown in Listing 13.26.
#include    "includes.h"

OS_STK  TestTaskStk[100];

void  main (void)
{
    OSInit();
    Turn LED OFF;                                                  (1)
    Install the clock tick interrupt vector;                       (2)
    OSTaskCreate(TestTask, (void *)0, &TestTaskStk[99], 0);        (3)
    OSStart();
}


void  TestTask (void *pdata)                                       (4)
{
    BOOLEAN  led_state;


    pdata = pdata;
    Initialize the clock tick interrupt (i.e., timer);             (5)
    Enable interrupts;                                             (6)
    led_state = FALSE;
    Turn ON LED;                                                   (7)
    while (1) {
        OSTimeDly(1);                                              (8)
        if (led_state == FALSE) {                                  (9)
            led_state = TRUE;
            Turn ON LED;
        } else {
            led_state = FALSE;
            Turn OFF LED;
        }
    }
}
(1) Regardless of whether you have a degugger or not, its useful for this test to have access to an LED (or some display device). You need to turn OFF the LED before you run the rest of the code.
(2) We will need to install the clock tick interrupt vector. You will need to consult your compiler or processor documentation to determine how to do this. Some processors do not allow you to install interrupt vectors at run time (e.g., the Motorola 68HC11 assumes that vectors reside in ROM). The tick interrupt needs to vector to your ports OSTickISR().
(3) We will create a high priority task. I decided to use priority level 0 but you can use anything below OS_LOWEST_PRIO (see OS_CFG.H).
(4) Again, since we proved in 13.06.02 that OSStartHighRdy() works, µC/OS-II should start executing TestTask() as its first task.
(5) Upon entry into TestTask(), we should intialize the device (typically a timer) to generate a clock tick interrupt at the desired rate. I would recommend making the tick rate 10 Hz or so in order to be able to make the LED blink at 5 Hz. This rate should match what you set OS_TICKS_PER_SEC to in OS_CFG.H.
(6) You can now enable interrupts to allow the tick interrupt to invoke OSTickISR().
(7) Turn ON the LED to show that you made it to TestTask().
(8) The call to OSTimeDly() will cause a context switch to the idle task using OSCtxSw(). The idle task will spin until the tick interrupt is received. The tick interrupt should invoke OSTickISR() which in turn calls OSTimeTick(). OSTimeTick() will decrement the .OSTCBDly count of TestTask() to 0 and make this task ready to run. When OSTickISR() completes and calls OSIntExit(), OSIntExit() should notice that the more important task, TestTask(), is ready to run and thus, the ISR will not return to the idle task but instead, context switch back to TestTask(). Of course, all this assumes that OSIntCtxSw() and OSTickISR() are both working.
(9) If OSIntCtxSw() does works, you ought to see the LED blink at 5Hz if you set the tick rate at 10 Hz.
If the LED is not blinking and you are using a debugger, you can set a breakpoint in OSTickISR() and follow whats going on. I would also suggest trying to run the ISR without having it call OSIntExit(). In this case, you could simply have the ISR blink the LED (or another LED). If the LED is blinking then the problem is with OSIntCtxSw(). Again, because OSIntCtxSw() should have been derived from OSCtxSw(), I suspect that the problem is in the OSTickISR().
At this point, your port should work and you can now start adding application tasks. Have fun!
OSCtxSw()
void OSCtxSw(void)
| File | Called from | |
|---|---|---|
OS_CPU_A.ASM | OS_TASK_SW() | Always needed |
This function is called to perform a task level context switch. Generally, this function is invoked via a software interrupt instruction (also called a TRAP instruction). The pseudocode for this function is shown below.
void  OSCtxSw (void)
{
    Save processor registers;
    Save the current tasks stack pointer into the current tasks OS_TCB:
        OSTCBCur->OSTCBStkPtr = Stack pointer;
    Call user definable OSTaskSwHook();
    OSTCBCur  = OSTCBHighRdy;
    OSPrioCur = OSPrioHighRdy;
    Get the stack pointer of the task to resume:
        Stack pointer = OSTCBHighRdy->OSTCBStkPtr;
    Restore all processor registers from the new tasks stack;
    Execute a return from interrupt instruction;
}
Arguments
NONE
Return Value
NONE
Notes/Warnings
Interrupts are disabled when this function is called.
Some compilers will allow you to create software interrupts (or traps) directly in C and thus, you could place this function in OS_CPU_C.C. In some cases, the compiler also requires that you declare the prototype for this function differently. In this case, you can define the #define constant OS_ISR_PROTO_EXT in your INCLUDES.H. This allows you to delare OSCtxSw() differently. In other words, you are not forced to use the void OSCtxSw(void) prototype.
Example
NONE
OSInitHookBegin()
void OSInitHookBegin(void)
| File | Called from | Code enabled in OS_CPU_C.C if |
|---|---|---|
OS_CPU_C.C | OSInit() | OS_CPU_HOOKS_EN == 1 |
This function is called by OSInit() at the very beginning of OSInit(). This allows you to perform CPU (or other) initialization as part of OSInit(). For example, you can initialize I/O devices from OSInitHookBegin(). The reason this is done is to encapsulate this initialization as part of the port. In other words, it prevents requiring that the user of µC/OS-II know anything about such additional initialization.
Arguments
NONE
Return Value
NONE
Notes/Warnings
NONE
Example
NONE
OSInitHookEnd()
void OSInitHookEnd(void)
| File | Called from | Code enabled in OS_CPU_C.C if |
|---|---|---|
OS_CPU_C.C | OSInit() | OS_CPU_HOOKS_EN == 1 |
This function is called by OSInit() at the very end of OSInit(). This allows you to perform CPU (or other) initialization as part of OSInit(). For example, you can initialize I/O devices from OSInitHookEnd(). The reason this is done is to encapsulate this initialization as part of the port. In other words, it prevents requiring that the user of µC/OS-II know anything about such additional initialization.
Arguments
NONE
Return Value
NONE
Notes/Warnings
NONE
Example
NONE
OSIntCtxSw()
void OSIntCtxSw(void)
| File | Called from | |
|---|---|---|
OS_CPU_A.ASM | OSIntExit() | Always needed |
This function is called from OSIntExit() when OSIntExit() determines that there is a higher priority task to execute because of an ISR. The pseudocode for this function is shown below.
void  OSIntCtxSw (void)
{
    Call user-definable OSTaskSwHook();
    OSTCBCur  = OSTCBHighRdy;
    OSPrioCur = OSPrioHighRdy;
    Get the stack pointer of the task to resume:
        Stack pointer = OSTCBHighRdy->OSTCBStkPtr;
    Restore all processor registers from the new tasks stack;
    Execute a return from interrupt instruction;
}
Arguments
NONE
Return Value
NONE
Notes/Warnings
Interrupts are disabled when this function is called.
Example
NONE
OSStartHighRdy()
void OSStartHighRdy(void)
| File | Called from | |
|---|---|---|
OS_CPU_A.ASM | OSStart() | Always needed |
This function is called from OSStart() to start the highest priority task that you created prior to you calling OSStart(). The pseudocode for this function is shown below.
void OSStartHighRdy (void)
{
    Call user definable OSTaskSwHook();
    OSRunning = TRUE;
    Get the stack pointer of the task to resume:
        Stack pointer = OSTCBHighRdy->OSTCBStkPtr;

    Restore all processor registers from the new task's stack;
    Execute a return from interrupt instruction;
}
void OSStartHighRdy (void)
Arguments
NONE
Return Value
NONE
Notes/Warnings
Interrupts are disabled when this function is called.
Example
NONE
OSTaskCreateHook()
void OSTaskCreateHook(OS_TCB *ptcb)
| File | Called from | Code enabled in OS_CPU_C.C if |
|---|---|---|
OS_CPU_C.C | OSTaskCreate() and OSTaskCreateExt() | OS_CPU_HOOKS_EN == 1 |
This function is called whenever a task is created, after a TCB has been allocated and initialized and after the stack frame of the task is initialized. OSTaskCreateHook() allows you to extend the functionality of the task creation function with your own features. For example, you can initialize and store the contents of floating-point registers, MMU registers or anything else that can be associated with a task. Typically, you would store this additional information in memory allocated by your application. You should note that OSTaskCreateHook() is called immediately after another hook function called OSTCBInitHook(). In other words, either of these functions can be used to initialize the TCB. However, you ought to use OSTCBInitHook() for TCB related items and OSTaskCreateHook() for other task related items. You could also use OSTaskCreateHook() to trigger an oscilloscope or a logic analyzer or to set a breakpoint.
Arguments
ptcb
is a pointer to the task control block of the task created.
Return Value
NONE
Notes/Warnings
Interrupts are enabled when this function is called. Because of this, you might need to call OS_ENTER_CRITICAL() and OS_EXIT_CRITICAL() to protect critical sections inside OSTaskCreateHook().
Example
This example assumes that you created a task using OSTaskCreateExt() because it expects to have the .OSTCBExtPtr field in the tasks OS_TCB contain a pointer to storage for floating-point registers.
void OSTaskCreateHook (OS_TCB *ptcb)
{
    if (ptcb->OSTCBExtPtr != (void *)0) {
        /* Save contents of floating-point registers in .. */
        /* .. the TCB extension                            */
    }
}
OSTaskDelHook()
void OSTaskDelHook(OS_TCB *ptcb)
| File | Called from | Code enabled in OS_CPU_C.C if |
|---|---|---|
OS_CPU_C.C | OSTaskDel() | OS_CPU_HOOKS_EN == 1 |
This function is called whenever you delete a task by calling OSTaskDel(). You can thus dispose of memory you have allocated through the task create hook, OSTaskCreateHook(). OSTaskDelHook() is called just before the TCB is removed from the TCB chain. You can also use OSTaskCreateHook() to trigger an oscilloscope or a logic analyzer or to set a breakpoint.
Arguments
ptcb
is a pointer to the task control block of the task being deleted.
Return Value
NONE
Notes/Warnings
Interrupts are disabled when this function is called. Because of this, you should keep the code in this function to a minimum because it directly affects interrupt latency.
Example
void OSTaskDelHook (OS_TCB *ptcb)
{
    /* Output signal to trigger an oscilloscope           */
}
OSTaskIdleHook()
void OSTaskIdleHook(void)
| File | Called from | Code enabled in OS_CPU_C.C if |
|---|---|---|
OS_CPU_C.C | OS_TaskIdle() | OS_CPU_HOOKS_EN == 1 |
This function is called by the idle task (OS_TaskIdle()) when there are no other higher priority task ready to run. OSTaskIdleHook() can be used to force the CPU in low power mode for battery operated products to conserve energy when none of your tasks need to be serviced.
Arguments
NONE
Return Value
NONE
Notes/Warnings
OSTaskIdleHook() is called with interrupts enabled.
Example
void OSTaskIdleHook (void)
{
    /* Put the CPU in low power mode.                        */
}
OSTaskStatHook()
void OSTaskStatHook(void)
| File | Called from | Code enabled in OS_CPU_C.C if |
|---|---|---|
OS_CPU_C.C | OSTaskStat() | OS_CPU_HOOKS_EN == 1 |
This function is called every second by µC/OS-IIs statistic task. OSTaskStatHook() allows you to add your own statistics.
Arguments
NONE
Return Value
NONE
Notes/Warnings
The statistic task starts executing about five seconds after calling OSStart(). Note that this function is not called if either OS_TASK_STAT_EN or OS_TASK_CREATE_EXT_EN is set to 0.
Example
void OSTaskStatHook (void)
{
    /* Compute the total execution time of all the tasks     */
    /* Compute the percentage of execution of each task      */
}
OSTaskStkInit()
OS_STK *OSTaskStkInit(void (*task)(void *pd), void *pdata, OS_STK *ptos, INT16U opt);
| File | Called from | |
|---|---|---|
OS_CPU_C.C | OSTaskCreate() or OSTaskCreateExt() | Always needed |
This function is called by either OSTaskCreate() or OSTaskCreateExt() to initialize the stack frame of a task. Generally speaking, the stack frame is made to look las if an interrupt just occurred and all the CPU registers were saved onto it. The pseudocode for this function is shown below.
OS_STK *OSTaskStkInit (void  (*task)(void *pd),
                       void   *pdata,
                       OS_STK *ptos,
                       INT16U  opt);
{
    Simulate call to function with an argument (i.e., pdata);
    Simulate ISR vector;
    Setup stack frame to contain desired initial values of all registers;
    Return new top-of-stack pointer to caller;
}
Arguments
task
is a pointer to the task code (i.e., the address of the function you want to declare as a task).
pdata
is a pointer to a user supplied data area that will be passed to the task when the task first executes. Sometimes, the compiler will pass pdata into registers while other compilers will pass pdata on the stack. You will need to consult your compiler documentation for the actual method used.
ptos
is a pointer to the top of stack. It is assumed that ptos points to a 'free' entry on the task stack. If OS_STK_GROWTH is set to 1 then ptos will contain the HIGHEST valid address of the stack. Similarly, if OS_STK_GROWTH is set to 0, ptos will contains the LOWEST valid address of the stack.
opt
specifies options that can be used to alter the behavior of OSTaskStkInit(). See uCOS_II.H for OS_TASK_OPT_???.
Return Value
A pointer to the new top-of-stack.
Notes/Warnings
Interrupts are enabled when this function is called.
Example
NONE
OSTaskSwHook()
void OSTaskSwHook(void)
| File | Called from | Code enabled in OS_CPU_C.C if |
|---|---|---|
OS_CPU_C.C | OSCtxSw() and OSIntCtxSw() | OS_CPU_HOOKS_EN == 1 |
This function is called whenever a context switch is performed. The global variable OSTCBHighRdy points to the TCB of the task that will get the CPU, and OSTCBCur points to the TCB of the task being switched out. OSTaskSwHook() is called just after saving the tasks registers and after saving the stack pointer into the current tasks TCB. You can use this function to save/restore the contents of floating-point registers or MMU registers, to keep track of task execution time and of how many times the task has been switched-in, and more. OSTaskSwHook() is also called by OSStartHighRdy(). Because of this, you need to verify the flag OSRunning in OSTaskSwHook() so you dont perform any action as you would when a task is switched-out (see the example).
Arguments
NONE
Return Value
NONE
Notes/Warnings
Interrupts are disabled when this function is called. Because of this, you should keep the code in this function to a minimum because it directly affects interrupt latency.
Example
void OSTaskSwHook (void)
{
    if (OSRunning == TRUE) {
        /* Save floating-point registers in current tasks TCB ext. */
    }
    /* Restore floating-point registers from new tasks TCB ext.    */
}
OSTCBInitHook()
void OSTCBInitHook(OS_TCB *ptcb)
| File | Called from | Code enabled in OS_CPU_C.C if |
|---|---|---|
OS_CPU_C.C | OS_TCBInit() | OS_CPU_HOOKS_EN == 1 |
This function is called whenever a task is created, after a TCB has been allocated and initialized and when the stack frame of the task is initialized. OSTCBInitHook() allows you to extend the functionality of the TCB creation function with your own features. For example, you can initialize and store the contents of floating-point registers, MMU registers or anything else that can be associated with a task. Typically, you would store this additional information in memory allocated by your application. You should note that OSTCBInitHook() is called immediately before OSTaskCreateHook(). In other words, either of these functions can be used to initialize the TCB. However, you ought to use OSTCBInitHook() for TCB related items and OSTaskCreateHook() for other task related items.
Arguments
ptcb
is a pointer to the task control block of the task created.
Return Value
NONE
Notes/Warnings
Interrupts are enabled when this function is called. Because of this, you might need to call OS_ENTER_CRITICAL() and OS_EXIT_CRITICAL() to protect critical sections inside OSTCBInitHook().
Example
This example assumes that you created a task using OSTaskCreateExt() because it expects to have the .OSTCBExtPtr field in the tasks OS_TCB contain a pointer to storage for floating-point registers.
void OSTCBInitHook (OS_TCB *ptcb)
{
    if (ptcb->OSTCBExtPtr != (void *)0) {
        /* Save contents of floating-point registers in .. */
        /* .. the TCB extension                            */
    }
}
OSTickISR()
void OSTickISR(void)
| File | Called from | |
|---|---|---|
OS_CPU_A.ASM | Tick Interrupt | Always needed |
When a tick interrupt occurs, the CPU needs to vector to this Interrupt Service Routine (ISR). The pseudocode for the ISR is shown below.
void  OSTickISR (void)
{
   Save processor registers;
   Call OSIntEnter() or increment OSIntNesting;
   if (OSIntNesting == 1) {
      OSTCBCur->OSTCBStkPtr = Stack Pointer;
   }
   Clear interrupting device;
   Re-enable interrupts (optional);
   Call OSTimeTick();
   Call OSIntExit();
   Restore processor registers;
   Execute a return from interrupt instruction;
}
Arguments
NONE
Return Value
NONE
Notes/Warnings
- The interrupting device that causes
OSTickISR()to be called should generally be setup to generate an interrupt every 10 to 100 mS. - Some compilers will allow you to create ISRs directly in C and thus, you could place this function in
OS_CPU_C.C. In some cases, the compiler also requires that you declare the prototype for this function differently. In this case, you can define the #define constantOS_ISR_PROTO_EXTin yourINCLUDES.H. This allows you to delareOSTickISR()differently. In other words, you are not forced to use the voidOSTickISR(void)prototype.
Example
NONE
OSTimeTickHook()
void OSTimeTickHook(void)
| File | Called from | Code enabled in OS_CPU_C.C if |
|---|---|---|
OS_CPU_C.C | OSTimeTick() | OS_CPU_HOOKS_EN == 1 |
This function is called by OSTimeTick(), which in turn is called whenever a clock tick occurs. OSTimeTickHook() is called immediately upon entering OSTimeTick(), to allow execution of time-critical code in your application. You can also use this function to trigger an oscilloscope for debugging, trigger a logic analyzer, or establish a breakpoint for an emulator.
Arguments
NONE
Return Value
NONE
Notes/Warnings
OSTimeTick() is generally called by an ISR, so the execution time of the tick ISR is increased by the code you provide in this function. Interrupts may or may not be enabled when OSTimeTickHook() is called, depending on how the processor port has been implemented. If interrupts are disabled, this function affects interrupt latency.
Example
void OSTimeTickHook (void)
{
    /* Trigger an oscilloscope                               */
}