Getting Started with µC/OS-II
This chapter provides four examples on how to use µC/OS-II. I decided to include this chapter early in the book so you could start using µC/OS-II as soon as possible. In fact, I assume you know little about µC/OS-II and multitasking; concepts are introduced as needed.
The sample code was compiled using the Borland C/C++ compiler V4.51 and options were selected to generate code for an Intel/AMD 80186 processor (large memory model). The code was actually run and tested on a 300MHz Intel Pentium II PC, running in a DOS window using Windows 2000. For all intents and purposes, a Pentium can be viewed as a superfast 80186 processor. The Borland C/C++ V4.52 (called the Borland Turbo C++ 4.5) is available from JK Microsystems (www.jkmicro.com and specifically: http://stores.jkmicro.com/borland-c-development-kit/.
The PC was chosen as my target system for a number of reasons. First and foremost, when I wrote the initial version of the book, it was a lot easier to test code on a PC than on any other embedded environment (i.e., evaluation board, emulator, etc.): there were no EPROMs to burn and no downloads to EPROM emulators, CPU emulators, etc. You simply compile, link, and run. Second, the 80186 object code (real mode, large model) generated using the Borland C/C++ compiler is compatible with all 80x86 derivative processors from Intel, AMD, and others. Today, you can get evaluation board for next to nothing and the 80x86 might not be the best embedded target but will nonetheless be covered in this document.
Installing µC/OS-II
You can download the example code from the Micrium website and you should refer to Appendix F for instruction on how to install the source of µC/OS-II and executables of the examples on your computer. The installation assumes that you will be installing the software on either a Windows 95, 98, Me, NT, 2000 or XP based computer.
Example 1: Basic Multitasking
Example #1 demonstrates basic multitasking capabilities of µC/OS-II. Ten tasks display a number between 0 and 9 at random locations on the screen. Each task displays only one of the number. In other words, one task displays 0 at random locations, another task displays 1 and so on.
The code for Example #1 is found in the \SOFTWARE\uCOS-II\EX1_x86L\BC45 directory of the installation drive (the default is C:). You can open a DOS window (called Command Prompt in Windows 2000) and type:
CD \SOFTWARE\uCOS-II\Ex1_x86L\BC45\TEST
The CD command allows you to change directory and, in this case, go to the TEST directory of Example #1. The TEST directory contains four files: MAKETEST.BAT, TEST.EXE, TEST.LNK and TEST.MAK. To execute example #1, simply type TEST at the command line prompt. The DOS window will run the TEST.EXE program.
After about one second, you should see the DOS window randomly fill up with numbers between 0 and 9 as shown in Figure 1.1.
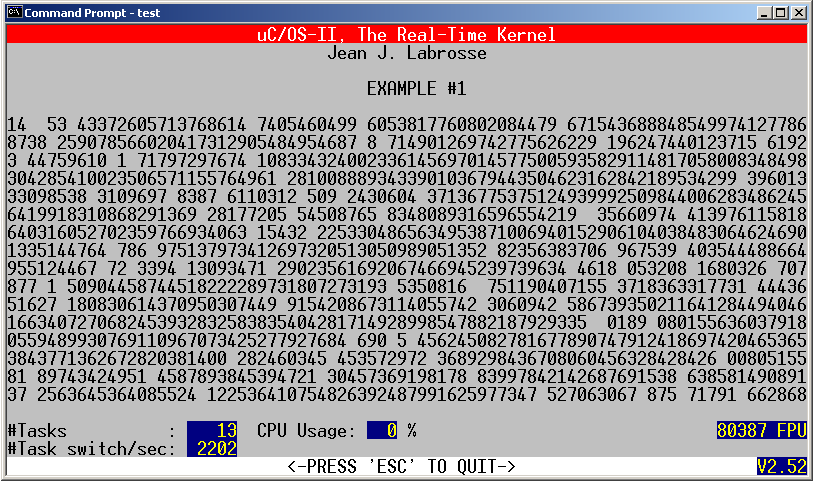
Example #1 basically consists of 13 tasks as displayed in the lower left of Figure 1.1. µC/OS-II creates two internal tasks: the idle task and a task that determines CPU usage. The code in Example #1 creates the other 11 tasks.
The source code for example #1 is found in TEST.C, in the SOURCE directory. You can get there from the TEST directory by typing:
CD ..\SOURCE
Portions of TEST.C are shown in Listing 1.1. You can examine the actual code using your favorite code editor.
Note: To describe listings and figures, I will place a reference in the margin. The reference corresponds to an element of the listing or figure that I want to bring your attention to. For example, L1.1(1) means: “please refer to Listing 1.1 and locate the item (1)”. This notation also applies to figures and thus F3.1(2) would mean: “please look at Figure 3.1 and examine item (2)”.
#include  "includes.h"                                           (1)

#define       TASK_STK_SIZE            512                       (2)
#define       N_TASKS                   10


OS_STK        TaskStk[N_TASKS][TASK_STK_SIZE];                   (3)
OS_STK        TaskStartStk[TASK_STK_SIZE];                       (4)
char          TaskData[N_TASKS];                                 (5)
OS_EVENT     *RandomSem;                                         (6)
(1) First, you will notice that there is only a single #include statement. That’s because I like to place all my header files in a ‘master’ header file called INCLUDES.H. Each source file always references this single include file and thus, I never need to worry about determining which headers I need; they all get included via INCLUDES.H. You can use your code editor to view the contents of INCLUDES.H which is also found in the SOURCE directory.
I will get back to Listing 1.1 later as needed. Like most C programs, we need a main() as shown in Listing 1.2.
void  main (void)
{
    PC_DispClrScr(DISP_FGND_WHITE + DISP_BGND_BLACK);                        (1)

    OSInit();                                                                (2)

    PC_DOSSaveReturn();                                                      (3)
    PC_VectSet(uCOS, OSCtxSw);                                               (4)

    RandomSem   = OSSemCreate(1);                                            (5)

    OSTaskCreate(TaskStart, (void *)0, &TaskStartStk[TASK_STK_SIZE - 1], 0); (6)

    OSStart();                                                               (7)
}
(1) µC/OS-II is a multitasking kernel and allows you to have up to 255 application tasks. µC/OS-II decides when to switch from one task to the other based on information you provide to µC/OS-II. One of the items you must tell µC/OS-II is the priority of your tasks. Changing between tasks is called a context switch.
main() starts by clearing the screen to ensure that no characters are left over from the previous DOS session. The function PC_DispClrScr() is found in a file called PC.C (see Chapter 18, PC Services for details). PC.C contains functions that provides services if you are running in a DOS environment (or a window under the Windows 95, 98, Me, NT, 2000 or XP operating systems). The PC_ prefix allows you to easily determine the name of the file where the function comes from; in this case, PC.C. You should note that I specified white letters on a black background. Since the screen will be cleared, I simply could have specified a black background and not specified a foreground. If I did this, and you decided to return to the DOS prompt, you would not see anything on the screen! It’s always better to specify a visible foreground just for this reason.
(2) A requirement of µC/OS-II is that you call OSInit() before you invoke any of its other services. OSInit() creates two tasks: an idle task, which executes when no other task is ready to run, and a statistic task, which computes CPU usage.
(3) The current DOS ‘environment’ is saved by calling PC_DOSSaveReturn(). This allows you to return to DOS as if you had never started µC/OS-II. You can refer to Chapter 18, PC Services for a description of what PC_DOSSaveReturn() does.
(4) main() calls PC_VectSet() (see Chapter 18, PC Services) to install the µC/OS-II context switch handler. Task-level context switching will be done by µC/OS-II by issuing an 80x86 INT instruction to this vector location. I decided to use vector 0x80 (i.e., 128) because it’s not used by either DOS or the BIOS.
(5) A binary semaphore is created to guard access to the random number generator function provided by the Borland C/C++ library. A semaphore is an object provided by the kernel to prevent multiple tasks from accessing the same resource (in this case a function) at the same time. I decided to use a semaphore because I didn’t know whether or not the random generator function was reentrant; I assumed it was not. By initializing the semaphore to 1, I’m telling µC/OS-II to only allow one task to access the random generator function at any given time. A semaphore must be ‘created’ before it can be used. This is done by calling OSSemCreate() and specifying its initial value. OSSemCreate() returns a ‘handle’ (see Listing 1.1(6)) to the semaphore which must be used to reference this particular semaphore.
(6) Before starting multitasking, you have to create at least one task. For this example, I called this task TaskStart(). You ‘create’ a task because you want to tell µC/OS-II to manage the task. The OSTaskCreate() function receives four arguments. The first argument is a pointer to the task’s address, in this case TaskStart(). The second argument is a pointer to data that you want to pass to the task when it first starts. In this case, there is nothing to pass and thus, I passed a NULL pointer but it could have been anything. I’ll discuss the use of this argument in Example #4. The third argument is the task’s top-of-stack (TOS). With µC/OS-II, as with most preemptive kernels, each task requires its own stack space. Each task in µC/OS-II can have a different size but, for simplicity, I made them all the same. On the 80x86 CPU, the stack grows downwards and thus, we must pass the highest most ‘valid’ TOS address to OSTaskCreate(). In this case, the stack is called TaskStartStk[] and is allocated at compile time. A stack must be declared having a type OS_STK (see Listing 1.1(4)). The size of the stack is declared in Listing 1.1(2). For the 80x86, an OS_STK is a 16-bit value and thus, the size of the stack is 1024 bytes. Finally, we must specify the priority of the task being created. The lower the priority number the higher the priority (i.e. its importance).
As previously mentioned, µC/OS-II allows you to create up to 255 tasks. However, each task must have a unique priority number between 0 and 254. You’re the one that actually decides what priority to give your tasks based on your application requirements. Priority level 0 is the highest priority.
(7) OSStart() is then called to start multitasking and give control to µC/OS-II. It is very important that you create at least one task before calling OSStart(). Failure to do this will certainly make your application crash. In fact, you may always want to create only one task if you are planning on using the CPU usage statistic task.
OSStart()’s job is to determine which, of all the tasks created, is the most important one (highest priority), and start executing this task. In our case, µC/OS-II created two low priority tasks: the idle task and the statistic task. main() created TaskStart() with a priority of 0. As I mentioned, priority 0 is the highest priority, and thus, OSStart() will start executing TaskStart().
You should note that OSStart() doesn’t return back to main(). However, if you call PC_DOSReturn(), multitasking would be halted and your application would return back to DOS (but not main()). In an embedded system, there is no need for an equivalent function to PC_DOSReturn() because you would most likely not be returning to anything!
As I mentioned in the previous section, OSStart() will select TaskStart() as the most important task to run first. TaskStart() is shown in Listing 1.3.
void  TaskStart (void *pdata)
{
#if OS_CRITICAL_METHOD == 3
    OS_CPU_SR  cpu_sr;
#endif
    char       s[100];
    INT16S     key;


    pdata = pdata;                                               (1)

    TaskStartDispInit();                                         (2)

    OS_ENTER_CRITICAL();                                         (3)
    PC_VectSet(0x08, OSTickISR);                                 (4)
    PC_SetTickRate(OS_TICKS_PER_SEC);                            (5)
    OS_EXIT_CRITICAL();                                          (6)

    OSStatInit();                                                (7)

    TaskStartCreateTasks();                                      (8)

    for (;;) {                                                   (9)
        TaskStartDisp();                                        (10)

        if (PC_GetKey(&key) == TRUE) {                          (11)
            if (key == 0x1B) {                                  (12)
                PC_DOSReturn();                                 (13)
            }
        }

        OSCtxSwCtr = 0;                                         (14)
        OSTimeDlyHMSM(0, 0, 1, 0);                              (15)
    }
}
(1) TaskStart() begins by setting pdata to itself. I do this because some compilers would complain (error or warning) if pdata is not referenced. In other words, I ‘fake’ the usage of pdata! pdata is a pointer passed to your task, when the task is created. The second argument passed in OSTaskCreate() is none other that the argument pdata of a task (see L1.2(6)). Because I passed a NULL pointer (again see L1.2(6)), I am not passing anything to TaskStart().
(2) TaskStart() then calls TaskStartDispInit() to initialize the display as shown in Figure 1.2. TaskStartDispInit() makes 25 consecutive calls to PC_DispStr() (see Chapter 18, PC Services) to fill the 25 lines of text of a typical DOS window.
(3) TaskStart() then invokes the macro OS_ENTER_CRITICAL() . OS_ENTER_CRITICAL() is basically a processor-specific macro and its used to disable interrupts (see Chapter 13, Porting µC/OS-II ).
(4) µC/OS-II, like all kernel, requires a time source to keep track of delays and timeouts. In real mode, the PC offers such a time source which occurs every 54.925 ms (18.20648 Hz) and is called a tick. PC_VectSet() allows us to replace the address where the PC goes to service the DOS tick with one that will be used by µC/OS-II. However, µC/OS-II will still call the DOS tick handler every 54.925 ms. This technique is called chaining and is setup by PC_DOSSaveReturn() (see Chapter 18, PC Services).
(5) We then change the tick rate rate from 18.2 Hz to 200 Hz. I selected 200 Hz because it’s almost an exact multiple of 18.2 Hz (i.e. 11 times faster). I never quite understood why IBM selected 18.2 Hz instead of 20 Hz as the tick rate on the original PC. Instead of setting up the 82C54 timer to divide the timer input frequency by 59,659 to obtain a nice 20 Hz, it appears that they left the 16-bit timer overflow every 65,536 pulses! Changing the tick rate is handled by another PC service called PC_SetTickRate() and is passed the desired tick rate (OS_TICKS_PER_SEC is set to 200 in OS_CPU.H).
(6) We then invoke the macro OS_EXIT_CRITICAL(). OS_EXIT_CRITICAL() is basically a processor-specific macro and its used to reenable interrupts (see Chapter 13, Porting µC/OS-II). OS_ENTER_CRITICAL() and OS_EXIT_CRITICAL() must be used in pair.
(7) OSStatInit() is called to determine the speed of your CPU (see Chapter 3, Kernel Structure). This allows µC/OS-II to know what percentage of the CPU is actually being used by all the tasks.
(8) TaskStart() then calls TaskStartCreateTasks() to let µC/OS-II manage more tasks. Specifically, we will be adding N_TASKS identical tasks (see Listing 1.1(2)). TaskStartCreateTasks() is shown in Listing 1.4.
static  void  TaskStartCreateTasks (void)
{
    INT8U  i;


    for (i = 0; i < N_TASKS; i++) {
        TaskData[i] = '0' + i;                                   (1)
        OSTaskCreate(Task,                                       (2)
                    (void *)&TaskData[i],                        (3)
                    &TaskStk[i][TASK_STK_SIZE - 1],              (4)
                    i + 1);                                      (5)
    }
}
(1) An array is initialized to contain the ASCII characters ‘0’ to ‘9’ (see also Listing 1.1(5)).
(2) The loop will initialize N_TASKS identical tasks called Task(). Task() will be responsible for placing an ASCII character at a random location on the screen. In fact, each instance of Task() will place a different character.
(3) Each of these task will receive a pointer to the array of ASCII characters. Each task will in fact receive a pointer to a different character.
(4) Again, each task requires its own stack space (see Listing 1.1(3)).
(5) With µC/OS-II, each task must have a unique priority. Since priority number 0 is already used by TaskStart(), I decided to create tasks with priorities 1 through 10.
As each task is created, µC/OS-II determines whether the created task is more important than the creator. If the created task had a higher priority then µC/OS-II would immediately run the created task. However, since TaskStart() has the highest priority (priority 0), none of the created tasks will execute just yet.
We can now resume discussion of Listing 1.3.
(9) With µC/OS-II, each task must be an infinite loop.
(10) TaskStartDisp() is called to display information at the bottom of the DOS window (see Figure 1.1). Specifically, TaskStartDisp() will print the number of tasks created, the current CPU usage in percentage, the number of context switches, the version of µC/OS-II and finally, whether your processor has a Floating-Point Unit (FPU) or not.
(11) TaskStart() then checks to see if you pressed a key by calling PC_GetKey().
(12) & (13) TaskStart() determines whether you pressed the ‘ESC’ key on your keyboard and if so, calls PC_DOSReturn() to exit this example and return back to the DOS prompt. You can find out how this is done by refering to Chapter 18, PC Services.
(14) If you didn’t press the ‘Esc’ key, the global variable OSCtxSwCtr (the context switch counter) is cleared so that we can display the number of context switches in one second.
(15) Finally, TaskStart() is suspended (will not run) for one complete second by calling OSTimeDlyHMSM(). The HMSM stands for Hours, Minutes, Seconds and Milliseconds and corresponds to the arguments passed to OSTimeDlyHMSM(). Because TaskStart() is suspended for one second, µC/OS-II will start exeuting the next most important task, in this case Task() at priority 1. You should note that without OSTimeDlyHMSM() (or other similar functions), TaskStart() would be a true infinite loop and other tasks would never get a chance to run.
The code for Task() is shown in Listing 1.5.
void  Task (void *pdata)
{
    INT8U  x;
    INT8U  y;
    INT8U  err;


    for (;;) {                                                       (1)
        OSSemPend(RandomSem, 0, &err);                               (2)
        x = random(80);                                              (3)
        y = random(16);                                              (4)
        OSSemPost(RandomSem);                                        (5)

        PC_DispChar(x, y + 5, *(char *)pdata, DISP_FGND_LIGHT_GRAY); (6)
        OSTimeDly(1);                                                (7)
    }
}
(1) As I previously mentioned, a µC/OS-II task is typically an infinite loop.
(2) The task starts by acquiring the semaphore which guards access to the Borland compiler random number generator function. This is done by calling OSSemPend() and passing it the ‘handle’ (see L1.1(6)) of the semaphore which was created to guard access to the random number generator function. The second argument of OSSemPend() is used to specify a timeout. A value of 0 means that this task will wait forever for the semaphore. Because the semaphore was initialized with a count of one and no other task has requested the semaphore, Task() is allowed to continue execution. If the semaphore was ‘owned’ by another task, µC/OS-II would have suspended this task, and executed the next most important task.
(3) The random number generator function is called and a value between 0 and 79 (inclusively) is returned. This happens to be the ‘X’ coordinate where we want to display the character ‘0’ (for this task) on the screen.
(4) Again, the random number generator is called and returns a number between 0 and 15 (inclusively). This value will be used to determine the ‘Y’ position of the character to display.
(5) The semaphore is released by calling OSSemPost(). Here we simply need to specify the semaphore ‘handle’.
(6) We can now display the character that was passed to Task() when Task() was created. For the first instance of Task(), the character would be ‘0’ and the last instance, it’s ‘9’. I added an offset of 5 lines from the top so that I don’t overwrite the header at the top of the display (see Figure 1.1).
(7) Finally, Task() calls OSTimeDly() to tell µC/OS-II that it’s done executing and to give other tasks a chance to run. The value of 1 means that I want this task to delay for one clock tick or, 5 ms since the tick rate is 200 Hz. When OSTimeDly() is called, µC/OS-II suspends the calling function and executes the next most important task. In this case, it would be another instance of Task() which would display ‘1’. This process goes on for all instances of Task() and thus, that’s why Figure 1.1 looks the way it does.
If you have the Borland C/C++ V4.5x compiler installed in the C:\BC45 directory, you can experiment with TEST.C. After modifying TEST.C, you can type MAKETEST from the command line prompt of the TEST directory which builds a new TEST.EXE. If you don’t have the Borland C/C++ V4.5x or your have it installed in a different directory, you can make the appropriate changes to TEST.MAK, INCLUDES.H and TEST.LNK.
The SOURCE directory contains four files: INCLUDES.H, OS_CFG.H, TEST.C and TEST.LNK. OS_CFG.H is used to determine µC/OS-II configuration options. TEST.LNK is the linker command file for the Borland linker, TLINK.
Example 2: Stack Checking
Example #2 demonstrates the stack checking feature of µC/OS-II. The amount of stack space used by each task is displayed along with the amount of free stack space. Also, Example #2 shows the execution time of the stack checking function OSTaskStkChk() since it depends on the size of each stack. It turns out that a heavily used stack requires less processing time.
The code for Example #2 is found in the \SOFTWARE\uCOS-II\EX2_x86L\BC45 directory. You can open a DOS window and type:
CD \SOFTWARE\uCOS-II\Ex2_x86L\BC45\TEST
To execute example #2, simply type TEST at the command line prompt. The DOS window will run the TEST.EXE program.
After about one second, you should see the screen shown in Figure 1.3.
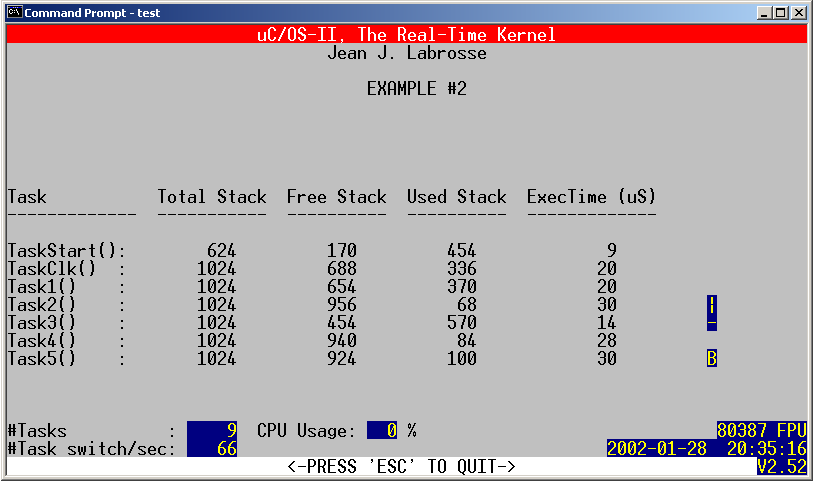
Example #2 consists of 9 tasks as displayed in the lower left of Figure 1.3. Of those 9 tasks, µC/OS-II creates two internal tasks: the idle task and a task that determines CPU usage. Example #2 creates the other 7 tasks.
Example #2 shows you how you can display task statistics beyond the number of tasks created, the number of context switches and the CPU usage. Specifically, Example #2 shows you how you can find out how much stack space each task is actually using and how much execution time it takes to determine the size of each task stack.
Example #2 makes use of the extended task create function (OSTaskCreateExt()) and the µC/OS-II stack-checking feature (OSTaskStkChk()). Stack checking is useful when you don’t actually know ahead of time how much stack space you need to allocate for each task. In this case, you would allocate much more stack space than you think you need and let µC/OS-II tell you exactly how much stack space is actually used. You obviously need to run the application long enough and under your worst case conditions to get valid numbers. Your final stack size should accommodate system expansion, so make sure you allocate between 10 and 25 percent more. In safety-critical applications, however, you may even want to consider 100 percent more! What you get from stack checking is a ballpark figure; you are not looking for an exact stack usage.
The µC/OS-II stack-checking function fills the stack of a task with zeros when the task is created. You accomplish this by telling OSTaskCreateExt() that you want to clear the stack upon task creation and, that you’ll want to check the stack (i.e., by setting the OS_TASK_OPT_STK_CLR and OS_TASK_OPT_STK_CHK for the opt argument). If you intend to create and delete tasks, you should set these options so that a new stack is cleared every time the task is created. You should note that having OSTaskCreateExt() clear the stack increases execution overhead, which obviously depends on the stack size.
µC/OS-II scans the stack starting at the bottom until it finds a nonzero entry. As the stack is scanned, µC/OS-II increments a counter that indicates how many entries are free.
The source code for example #2 is found in TEST.C, in the SOURCE directory. You can get there from the TEST directory by typing:
CD ..\SOURCE
Portions of TEST.C are shown in Listing 1.6. You can examine the actual code using your favorite code editor.
#include "includes.h"                                                (1)

#define          TASK_STK_SIZE     512                               (2)

#define          TASK_START_ID       0                               (3)
#define          TASK_CLK_ID         1
#define          TASK_1_ID           2
#define          TASK_2_ID           3
#define          TASK_3_ID           4
#define          TASK_4_ID           5
#define          TASK_5_ID           6

#define          TASK_START_PRIO    10                               (4)
#define          TASK_CLK_PRIO      11
#define          TASK_1_PRIO        12
#define          TASK_2_PRIO        13
#define          TASK_3_PRIO        14
#define          TASK_4_PRIO        15
#define          TASK_5_PRIO        16

OS_STK        TaskStartStk[TASK_STK_SIZE];                           (5)
OS_STK        TaskClkStk[TASK_STK_SIZE];
OS_STK        Task1Stk[TASK_STK_SIZE];
OS_STK        Task2Stk[TASK_STK_SIZE];
OS_STK        Task3Stk[TASK_STK_SIZE];
OS_STK        Task4Stk[TASK_STK_SIZE];
OS_STK        Task5Stk[TASK_STK_SIZE];

OS_EVENT     *AckMbox;                                               (6)
OS_EVENT     *TxMbox;
Based on what you learned in Example #1, you should recognize:
(1) INCLUDES.H as the master include file.
(2) The size of each task stacks (TASK_STK_SIZE). Again, I made all stack sizes the same for simplicity but with µC/OS-II, the stack size for each task can be different.
(5) The storage for the task stacks.
main() for example #2 is shown in Listing 1.7 and look very similar to the main() of example #1. I will only describe the differences.
void main (void)
{
    OS_STK *ptos;
    OS_STK *pbos;
    INT32U  size;


    PC_DispClrScr(DISP_FGND_WHITE);

    OSInit();

    PC_DOSSaveReturn();
    PC_VectSet(uCOS, OSCtxSw);

    PC_ElapsedInit();                                              (1)

    ptos        = &TaskStartStk[TASK_STK_SIZE - 1];                (2)
    pbos        = &TaskStartStk[0];
    size        = TASK_STK_SIZE;
    OSTaskStkInit_FPE_x86(&ptos, &pbos, &size);                    (3)
    OSTaskCreateExt(TaskStart,                                     (4)
                   (void *)0,
                   ptos,                                            (5)
                   TASK_START_PRIO,                                 (6)
                   TASK_START_ID,                                   (7)
                   pbos,                                            (8)
                   size,                                            (9)
                   (void *)0,                                      (10)
                   OS_TASK_OPT_STK_CHK | OS_TASK_OPT_STK_CLR);     (11)

    OSStart();
}
(1) main() calls PC_ElapsedInit() to initialize the elapsed time measurement function that will be used to measure the execution time of OSTaskStkChk(). This function basically measures the execution time (i.e. overhead) of two functions: PC_ElapsedStart() and PC_ElapsedStop(). By measuring this time, we can determine fairly precisely how long it takes to execute code that’s wrapped between these two calls.
(2) & (3) TaskStart() in example #2 will be invoking the floating-point emulation library instead of making use of the Floating-Point Unit (FPU) which is present on 80486 and higher-end PCs. The Borland compiler defaults to use its emulation library if an FPU is not detected. In other words, if you were to run TEST.EXE on a DOS based machine equiped with an Intel 80386EX (without an 80387 coprocessor) then, the floating-point unit would be emulated. The emulation library is unfortunately non-reentrant and we have to ‘trick’ it in order to allow multiple tasks to do floating-point math. For now, let me just say that we have to modify the task stack to accommodate the floating-point emulation library. This is accomplished by calling OSTaskStkInit_FPE_x86() (see Chapter 14, 80x86 Port). You will notice from Figure 1.3 that the stack size reported for TaskStart() is 624 instead of 1024. That’s because OSTaskStkInit_FPE_x86() reserves the difference for the floating-point emulation library.
(4) Instead of calling OSTaskCreate() to create TaskStart(), we must call OSTaskCreateExt() (the extended version of OSTaskCreate()) because we modified the stack and also because we want to check the stack size at run-time (described later).
(5) OSTaskStkInit_FPE_x86() modifies the top-of-stack pointer so we must pass the new pointer to OSTaskCreateExt().
(6) Instead of passing a hard-coded priority (as I did in example #1), I created a #define symbol (see L1.6(4)).
(7) OSTaskCreateExt() requires that you pass a task identifier (ID). The actual value can be anything since this field is not actually used by µC/OS-II at this time.
(8) OSTaskStkInit_FPE_x86() modifies the bottom-of-stack pointer so we must pass the new pointer to OSTaskCreateExt().
(9) OSTaskStkInit_FPE_x86() also modifies the size of the stack so we must pass the new size to OSTaskCreateExt().
(10) One of OSTaskCreateExt()‘s argument is a Task Control Block (TCB) extension pointer. This argument is not used in example #2 so we simply pass a NULL pointer.
(11) Finally, the last argument to OSTaskCreateExt() is a set of options (i.e. bits) that tell OSTaskCreateExt() that we will be doing stack size checking and that we want to clear the stack when the task is created.
TaskStart() is similar to the one described in example #1 and is shown in Listing 1.8. Again, I will only describe the differences.
void  TaskStart (void *pdata)
{
#if OS_CRITICAL_METHOD == 3
    OS_CPU_SR  cpu_sr;
#endif
    INT16S     key;


    pdata = pdata;

    TaskStartDispInit();                                          (1)

    OS_ENTER_CRITICAL();
    PC_VectSet(0x08, OSTickISR);
    PC_SetTickRate(OS_TICKS_PER_SEC);
    OS_EXIT_CRITICAL();

    OSStatInit();

    AckMbox = OSMboxCreate((void *)0);                            (2)
    TxMbox  = OSMboxCreate((void *)0);

    TaskStartCreateTasks();                                       (3)

    for (;;) {
        TaskStartDisp();

        if (PC_GetKey(&key)) {
            if (key == 0x1B) {
                PC_DOSReturn();
            }
        }

        OSCtxSwCtr = 0;
        OSTimeDly(OS_TICKS_PER_SEC);                              (4)
    }
}
(1) Although the function call is identical TaskStartDispInit() initializes the display as shown in Figure 1.4.
(2) µC/OS-II allows you to have tasks or ISRs send messages to other tasks. In example #2, I will have task #4 send a message to task #5 and, task #5 will respond back to task #4 with an acknowledgement message (described later). For this purpose, we need to create two kernel objects that are called mailboxes. A mailbox allows a task or an ISR to send a ‘pointer’ to another task. The mailbox only has room for a single pointer. What the pointer points to is application specific and of course, both the sender and the receiver need to agree about the contents of the message.
(3) TaskStartCreateTasks() creates six tasks using OSTaskCreateExt(). These tasks will not be doing floating-point operations and thus, there is no need to call OSTaskStkInit_FPE_x86() to modify the stacks. However, I will be doing stack checking on these tasks so I call OSTaskCreateExt() with the proper options set.
(4) In example #1, I called OSTimeDlyHMSM() to delay TaskStart() for one second. I decided to use OSTimeDly(OS_TICKS_PER_SEC) to show you that you can use either method. However, OSTimeDly() is slightly faster than OSTimeDlyHMSM().
The code for Task1() is shown in Listing 1.9. Task1() checks the size of the stack for each of the seven application tasks (the six tasks created by TaskStart() and TaskStart() itself).
void  Task1 (void *pdata)
{
    INT8U       err;
    OS_STK_DATA data;
    INT16U      time;
    INT8U       i;
    char        s[80];


    pdata = pdata;
    for (;;) {
        for (i = 0; i < 7; i++) {
            PC_ElapsedStart();                                        (1)
            err  = OSTaskStkChk(TASK_START_PRIO + i, &data);          (2)
            time = PC_ElapsedStop();                                  (3)
            if (err == OS_NO_ERR) {
                sprintf(s, "%4ld        %4ld        %4ld        %6d", (4)
                        data.OSFree + data.OSUsed,
                        data.OSFree,
                        data.OSUsed,
                        time);
                PC_DispStr(19, 12 + i, s, DISP_FGND_YELLOW);          (5)
            }
        }
        OSTimeDlyHMSM(0, 0, 0, 100);                                  (6)
    }
}
(1) & (3) The execution time of OSTaskStkChk() is measured by wrapping OSTaskStkChk() with calls to PC_ElapsedStart() and PC_ElapsedStop(). PC_ElapsedStop() returns the time difference in microseconds.
(2) OSTaskStkChk() is a service provided by µC/OS-II to allow your code to determine the actual stack usage of a task. You call OSTaskStkChk() by passing it the task priority of the task you want to check. The second argument to the function is a pointer to a data structure that will hold information about the task’s stack. Specifically, OS_STK_DATA contains the number of bytes used and the number of bytes free. OSTaskStkChk() returns an error code that indicates whether the call was successful. It would not be successful if I had passed the priority number of a task that didn’t exist.
(4) & (5) The information retrieved by OSTaskStkChk() is formatted into a string and displayed.
(6) I decided to execute this task 10 times per second but in an actual product or application, you would most likely run stack checking every few seconds or so. In other words, it might not make sense to consume valuable CPU processing time to determine worst case stack growth.
The code for Task2() and Task3() is shown in listing 1.10. Both of these task display a spinning wheel. The two tasks are almost identical. Task3() allocates and initializes a ‘dummy’ array of 500 bytes. I wanted to ‘consume’ stack space to show you that OSTaskStkChk() would report that Task3() has 502 bytes less than Task2() on its stack (500 bytes for the array and 2 bytes for the 16-bit integer). Task2()’s wheel spins clockwise at 5 rotations per second and Task3()’s wheel spins counterclockwise at 2.5 rotations per second.
Note: If you run example #2 in a window under Windows 95, 98, Me, NT, 2000 or XP, the rotation may not appear as quick. Simply press and hold the ‘Alt’ key and then press the ‘Enter’ key on your keyboard to make the DOS window use the whole screen. You can go back to window mode by repeating the operation.
void  Task2 (void *data)
{
    data = data;
    for (;;) {
        PC_DispChar(70, 15, '|',  DISP_FGND_WHITE + DISP_BGND_RED);
        OSTimeDly(10);
        PC_DispChar(70, 15, '/',  DISP_FGND_WHITE + DISP_BGND_RED);
        OSTimeDly(10);
        PC_DispChar(70, 15, '-',  DISP_FGND_WHITE + DISP_BGND_RED);
        OSTimeDly(10);
        PC_DispChar(70, 15, '\\', DISP_FGND_WHITE + DISP_BGND_RED);
        OSTimeDly(10);
    }
}

void  Task3 (void *data)
{
    char    dummy[500];
    INT16U  i;


    data = data;
    for (i = 0; i < 499; i++) {
        dummy[i] = '?';
    }
    for (;;) {
        PC_DispChar(70, 16, '|',  DISP_FGND_WHITE + DISP_BGND_BLUE);
        OSTimeDly(20);
        PC_DispChar(70, 16, '\\', DISP_FGND_WHITE + DISP_BGND_BLUE);
        OSTimeDly(20);
        PC_DispChar(70, 16, '-',  DISP_FGND_WHITE + DISP_BGND_BLUE);
        OSTimeDly(20);
        PC_DispChar(70, 16, '/',  DISP_FGND_WHITE + DISP_BGND_BLUE);
        OSTimeDly(20);
    }
}
Task4() and Task5() are shown in Listing 1.11.
void  Task4 (void *data)
{
    char   txmsg;
    INT8U  err;


    data  = data;
    txmsg = 'A';
    for (;;) {
        OSMboxPost(TxMbox, (void *)&txmsg);                         (1)
        OSMboxPend(AckMbox, 0, &err);                               (2)
        txmsg++;                                                    (3)
        if (txmsg == 'Z') {
            txmsg = 'A';
        }
    }
}
void  Task5 (void *data)
{
    char  *rxmsg;
    INT8U  err;


    data = data;
    for (;;) {
        rxmsg = (char *)OSMboxPend(TxMbox, 0, &err);                  (4)
        PC_DispChar(70, 18, *rxmsg, DISP_FGND_YELLOW + DISP_BGND_RED);(5)
        OSTimeDlyHMSM(0, 0, 1, 0);                                    (6)
        OSMboxPost(AckMbox, (void *)1);                               (7)
    }
}
(1) Task4() sends a message (an ASCII character) to Task5() by posting the message to the TxMbox.
(2) Task4() then waits for an acknowledgement from Task5() by waiting on the AckMbox. The second argument to the OSMboxPend() call specifies a timeout and I specified to wait forever because I passed a value of 0. By specifying a non-zero value, Task4() would have given up waiting after the specified timeout. The timeout is specified as an integral number of clock ticks.
(3) The message is changed when Task5() acknowledges the previous message.
(4) When Task5() starts execution, it immediately waits (forever) for a message to arrive through the mailbox TxMbox.
(5) When the message arrives, Task5() displays it on the screen.
(6) & (7) Task5() then waits for one second before acknowledging Task4(). I decided to wait for one second so that you could see it change on the screen. In fact, there must either be a delay in Task5() or one in Task4() otherwise, all lower priority tasks would not be allowed to run!
Finally, the code for TaskClk() is shown in Listing 1.12. This task executes every second and simply obtains the current date and time from a PC service called PC_GetDateTime() (see Chapter 18, PC Services) and displays it on the screen.
void  TaskClk (void *data)
{
    char s[40];


    data = data;
    for (;;) {
        PC_GetDateTime(s);
        PC_DispStr(60, 23, s, DISP_FGND_BLUE + DISP_BGND_CYAN);
        OSTimeDly(OS_TICKS_PER_SEC);
    }
}
If you have the Borland C/C++ V4.5x compiler installed in the C:\BC45 directory, you can experiment with TEST.C. After modifying TEST.C, you can type MAKETEST from the command line prompt of the TEST directory which builds a new TEST.EXE. If you don’t have the Borland C/C++ V4.5x or your have it installed in a different directory, you can make changes to TEST.MAK, INCLUDES.H and TEST.LNK accordingly.
The SOURCE directory contains four files: INCLUDES.H, OS_CFG.H, TEST.C and TEST.LNK. OS_CFG.H is used to determine µC/OS-II configuration options. TEST.LNK is the linker command file for the Borland linker, TLINK.
Example 3: Extending Functionality with TCB
Example #3 shows how you can extend the functionality of µC/OS-II. Specifically, Example #3 uses the TCB (Task Control Block) extension capability of OSTaskCreateExt(), the user-defined context switch hook [OSTaskSwHook()], the user-defined statistic task hook [OSTaskStatHook()], and message queues. In this example you will see how easy it is to determine how many times a task executes, and how much time a task takes to execute. The execution time can be used to determine the CPU usage of a task relative to the other tasks.
The code for Example #3 is found in the \SOFTWARE\uCOS-II\EX3_x86L\BC45 directory. You can open a DOS window and type:
CD \SOFTWARE\uCOS-II\Ex3_x86L\BC45\TEST
As usual, to execute example #3, simply type TEST at the command line prompt. The DOS window will run the TEST.EXE program.
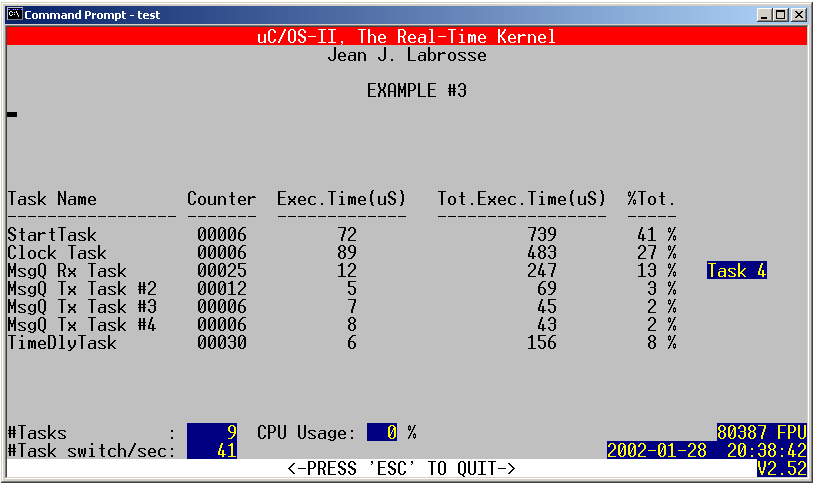
After about one second, you should see the screen shown in Figure 1.5. I let TEST.EXE run for a couple of seconds before I captured the screen shot. Seven tasks are shown along with how many times they executed (Counter column), the execution time of each task in microseconds (Exec.Time(uS) column), the total execution time since I started (Tot.Exec.Time(uS) column) and finally, the percentage of execution time of each task relative to the other tasks (%Tot. column).
Example #3 consists of 9 tasks as displayed in the lower left of Figure 1.5. Of those 9 tasks, µC/OS-II creates two internal tasks: the idle task and a task that determines CPU usage. Example #3 creates the other 7 tasks.
Portions of TEST.C are shown in Listing 1.13. You can examine the actual code using your favorite code editor.
#include  "includes.h"

#define          TASK_STK_SIZE     512

#define          TASK_START_ID       0
#define          TASK_CLK_ID         1
#define          TASK_1_ID           2
#define          TASK_2_ID           3
#define          TASK_3_ID           4
#define          TASK_4_ID           5
#define          TASK_5_ID           6

#define          TASK_START_PRIO    10
#define          TASK_CLK_PRIO      11
#define          TASK_1_PRIO        12
#define          TASK_2_PRIO        13
#define          TASK_3_PRIO        14
#define          TASK_4_PRIO        15
#define          TASK_5_PRIO        16

#define          MSG_QUEUE_SIZE     20

typedef struct {                                                    (1)
    char    TaskName[30];
    INT16U  TaskCtr;
    INT16U  TaskExecTime;
    INT32U  TaskTotExecTime;
} TASK_USER_DATA;

OS_STK          TaskStartStk[TASK_STK_SIZE];
OS_STK          TaskClkStk[TASK_STK_SIZE];
OS_STK          Task1Stk[TASK_STK_SIZE];
OS_STK          Task2Stk[TASK_STK_SIZE];
OS_STK          Task3Stk[TASK_STK_SIZE];
OS_STK          Task4Stk[TASK_STK_SIZE];
OS_STK          Task5Stk[TASK_STK_SIZE];

TASK_USER_DATA  TaskUserData[7];                                    (2)

OS_EVENT     *MsgQueue;                                             (3)
void         *MsgQueueTbl[20];
(1) A data structure is created to hold additional information about a task. Specifically, the data structure allows you to add a name to a task (µC/OS-II doesn’t directly provide this feature), keep track of how many times a task has executed, how long a task takes to execute and finally, the total time a task has executed.
(2) An array of the TASK_USER_DATA is allocated to hold information about each task created (except the idle and statistic task).
(3) µC/OS-II provides another message passing mechanism called a message queue. A message queue is like a mailbox except that instead of being able to send a single pointer, a queue can hold more than one message (i.e. pointers). A message queue thus allows your tasks or ISRs to send messages to other tasks. What each of the pointers point to is application specific and of course, both the sender and the receiver need to agree about the contents of the messages. Two elements are needed to create a message queue: an OS_EVENT structure and an array of pointers. The depth of the queue is determined by the number of pointers allocated in the pointer array. In this case, the message queue contains 20 entries.
main() is shown in Listing 1.14. Once more, only the new features will be described.
void  main (void)
{
    PC_DispClrScr(DISP_BGND_BLACK);

    OSInit();

    PC_DOSSaveReturn();

    PC_VectSet(uCOS, OSCtxSw);

    PC_ElapsedInit();

    strcpy(TaskUserData[TASK_START_ID].TaskName, "StartTask");      (1)
    OSTaskCreateExt(TaskStart,
                    (void *)0,
                    &TaskStartStk[TASK_STK_SIZE - 1],
                    TASK_START_PRIO,
                    TASK_START_ID,
                    &TaskStartStk[0],
                    TASK_STK_SIZE,
                    &TaskUserData[TASK_START_ID],                   (2)
                    0);
    OSStart();
}
(1) Before a task is created, we assign a name to the task using the ANSI C library function strcpy(). The name is stored in the data structure (see L1.13(1)) assigned to the task.
(2) TaskStart() is created using OSTaskCreateExt() and passed a pointer to its user data structure. The Task Control Block (TCB) of each task in µC/OS-II can store a pointer to a user provided data structure (see Chapter 3, Kernel Structure for details). This allows you to extend the functionality of µC/OS-II as you will see shortly.
The code for TaskStart() is shown in Listing 1.15.
void  TaskStart (void *pdata)
{
#if OS_CRITICAL_METHOD == 3
    OS_CPU_SR  cpu_sr;
#endif
    INT16S     key;


    pdata = pdata;

    TaskStartDispInit();

    OS_ENTER_CRITICAL();
    PC_VectSet(0x08, OSTickISR);
    PC_SetTickRate(OS_TICKS_PER_SEC);
    OS_EXIT_CRITICAL();

    OSStatInit();

    MsgQueue = OSQCreate(&MsgQueueTbl[0], MSG_QUEUE_SIZE);         (1)

    TaskStartCreateTasks();                                        (2)

    for (;;) {
        TaskStartDisp();

        if (PC_GetKey(&key)) {
            if (key == 0x1B) {
                PC_DOSReturn();
            }
        }

        OSCtxSwCtr = 0;
        OSTimeDly(OS_TICKS_PER_SEC);
    }
}
(1) Not much has been added except the creation of the message queue that will be used by Task1(), Task2(), Task3() and Task4().
(2) Like with Example #2, TaskStartCreateTasks() create 6 tasks. The difference is that each task is assigned an entry in the TaskUserData[] array. As each task is created, it’s assigned a name just like I did when I created TaskStart() (see L1.14(1)).
As soon as TaskStart() calls OSTimeDly(OS_TICKS_PER_SEC), µC/OS-II will locate the next highest priority task that’s ready to run. This will be Task1(). Listing 1.16 shows the code for Task1(), Task2(), Task3() and Task4() because I will discuss them next.
void  Task1 (void *pdata)
{
    char  *msg;
    INT8U  err;


    pdata = pdata;
    for (;;) {
        msg = (char *)OSQPend(MsgQueue, 0, &err);                   (1)
        PC_DispStr(70, 13, msg, DISP_FGND_YELLOW + DISP_BGND_BLUE); (2)
        OSTimeDlyHMSM(0, 0, 0, 100);                                (3)
    }
}

void  Task2 (void *pdata)
{
    char  msg[20];


    pdata = pdata;
    strcpy(&msg[0], "Task 2");
    for (;;) {
        OSQPost(MsgQueue, (void *)&msg[0]);                          (4)
        OSTimeDlyHMSM(0, 0, 0, 500);                                 (5)
    }
}

void  Task3 (void *pdata)
{
    char  msg[20];


    pdata = pdata;
    strcpy(&msg[0], "Task 3");
    for (;;) {
        OSQPost(MsgQueue, (void *)&msg[0]);                           (6)
        OSTimeDlyHMSM(0, 0, 0, 500);
    }
}

void  Task4 (void *pdata)
{
    char  msg[20];


    pdata = pdata;
    strcpy(&msg[0], "Task 4");
    for (;;) {
        OSQPost(MsgQueue, (void *)&msg[0]);                           (7)
        OSTimeDlyHMSM(0, 0, 0, 500);
    }
}
(1) Task1() waits forever for a message to arrive through a message queue.
(2) When a message arrives, it is displayed on the screen.
(3) The task is delayed for 100 ms to allow you to see the message received.
(4) Task2() sends the message "Task 2" to Task1() through the message queue.
(5) Task2() waits for half a second before sending another message.
(6) & (7) Task3() and Task4() sends their message and also waits half a second between messages.
Another task, Task5() (not shown) does nothing useful except delay itself for 1/10 of a second. Note that all µC/OS-II tasks must call a service provided by µC/OS-II to either wait for time to expire or for an event to occur. If this is not done, the task prevents all lower priority tasks from running.
Finally, TaskClk() (also not shown) displays the current date and time once a second.
Events happen behind the scenes that are not apparent just by looking at the tasks in TEST.C. µC/OS-II is provided in source form and it’s quite easy to add functionality to µC/OS-II through special functions called hooks. As of V2.52, there are 9 hook functions and the prototype for these functions are shown in Listing 1.17.
void  OSInitHookBegin(void);
void  OSInitHookEnd(void);
void  OSTaskCreateHook(OS_TCB *ptcb);
void  OSTaskDelHook(OS_TCB *ptcb);
void  OSTaskIdleHook(void);
void  OSTaskStatHook(void);
void  OSTaskSwHook(void);
void  OSTCBInitHook(OS_TCB *ptcb);
void  OSTimeTickHook(void);
The hook functions are normally found in a file called OS_CPU_C.C, and are generally written by the person who does the port for the processor you intend to use. However, if you set a configuration constant called OS_CPU_HOOKS_EN to 0, you can declare the hook functions in a different file. OS_CPU_HOOKS_EN is one of many configuration constant found in the header file OS_CFG.H. Every project that uses µC/OS-II needs its own version of OS_CFG.H because you may want to configure µC/OS-II differently for each projet. Each example provided in this book contains its own OS_CFG.H in the SOURCE directory.
In example #3, I set OS_CPU_HOOKS_EN to 0 and redefined the functionality of the hook functions in TEST.C. As shown in Listing 1.18, seven of the nine hooks don’t actually do anything and thus, don’t contain any code.
void  OSInitHookBegin (void)
{
}

void  OSInitHookEnd (void)
{
}

void  OSTaskCreateHook (OS_TCB *ptcb)
{
    ptcb = ptcb;
}

void  OSTaskDelHook (OS_TCB *ptcb)
{
    ptcb = ptcb;
}

void  OSTaskIdleHook (void)
{
}

void  OSTCBInitHook (OS_TCB *ptcb)
{
    ptcb = ptcb;
}

void  OSTimeTickHook (void)
{
}
The code for OSTaskSwHook() is shown in Listing 1.19 and allows us to measure the execution time of each task, keeps track of how often each task executes, and accumulate total execution times of each task. OSTaskSwHook() is called when µC/OS-II switches from a low priority task to a higher priority task.
void  OSTaskSwHook (void)
{
    INT16U           time;
    TASK_USER_DATA  *puser;


    time  = PC_ElapsedStop();                                    (1)
    PC_ElapsedStart();                                           (2)
    puser = OSTCBCur->OSTCBExtPtr;                               (3)
    if (puser != (TASK_USER_DATA *)0) {                          (4)
        puser->TaskCtr++;                                        (5)
        puser->TaskExecTime     = time;                          (6)
        puser->TaskTotExecTime += time;                          (7)
    }
}
(1) A timer on the PC obtains the execution time of the task being ‘switched out’ through PC_ElapsedStop().
(2) It is assumed that the timer was started by calling PC_ElapsedStart() when the task was ‘switched in’. The first context switch will probably read an incorrect value, but this is not really critical.
(3) When OSTaskSwHook() is called, the global pointer OSTCBCur points to the TCB of the current task while OSTCBHighRdy points to the TCB of the new task. In this case, however, we don’t use OSTCBHighRdy. OSTaskSwHook() retrieves the pointer to the TCB extension that was passed in OSTaskCreateExt().
(4) We then check to make sure we don’t deference a NULL pointer. In fact, some of the tasks in this example do not contain a TCB extension pointer: the idle task and the statistic task.
(5) We increment a counter that indicates how many times the task has executed. This counter is useful to determine if a particular task is running.
(6) The measured execution time (in microseconds) is stored in the TCB extension.
(7) The total execution time (in microseconds) of the task is also stored in the TCB extension. This allows you to determine the percent of time each task takes with respect to other tasks in an application (will be discussed shortly).
When enabled (see OS_TASK_STAT_EN in OS_CFG.H), the statistic task, OSTaskStat() calls the user-definable function OSTaskStatHook() that is shown in Listing 1.20. OSTaskStatHook() is called every second.
void  OSTaskStatHook (void)
{
    char    s[80];
    INT8U   i;
    INT32U  total;
    INT8U   pct;


    total = 0L;
    for (i = 0; i < 7; i++) {
        total += TaskUserData[i].TaskTotExecTime;                    (1)
        DispTaskStat(i);                                             (2)
    }
    if (total > 0) {
        for (i = 0; i < 7; i++) {
            pct = 100 * TaskUserData[i].TaskTotExecTime / total;     (3)
            sprintf(s, "%3d %%", pct);
            PC_DispStr(62,                                           (4)
                       i + 11,
                       s,
                       DISP_FGND_BLACK + DISP_BGND_LIGHT_GRAY);
        }
    }
    if (total > 1000000000L) {
        for (i = 0; i < 7; i++) {
            TaskUserData[i].TaskTotExecTime = 0L;
        }
    }
}
(1) The total execution time of all the tasks (except the statistic task) is computed.
(2) Individual statistics are displayed at the proper location on the screen by DispTaskStat(), which takes care of converting the values into ASCII. In addition, DispTaskStat() also displays the name of each task.
(3) & (4) The percent execution time is computed for each task and displayed.
If you have the Borland C/C++ V4.5x compiler installed in the C:\BC45 directory, you can experiment with TEST.C. After modifying TEST.C, you can type MAKETEST from the command line prompt of the TEST directory which builds a new TEST.EXE. If you don’t have the Borland C/C++ V4.5x or your have it installed in a different directory, you can make changes to TEST.MAK, INCLUDES.H and TEST.LNK accordingly.
The SOURCE directory contains four files: INCLUDES.H, OS_CFG.H, TEST.C and TEST.LNK. OS_CFG.H is used to determine µC/OS-II configuration options. TEST.LNK is the linker command file for the Borland linker, TLINK.
Example 4: Ports
µC/OS-II is written entirely in C and requires some processor specific code to adapt it to different processors. This processor specific code is called a port. This book comes with two ports for the Intel 80x86 family of processors: Ix86L (see Chapter 14) and Ix86L-FP (see Chapter 15). Ix86L is used with 80x86 processors that are not fortunate enough to have an FPU (floating-point unit) and Ix86L was used in all the examples so far. You should note that Ix86L still runs on 80x86 processors that do have an FPU. Ix86L-FP allows your applications to make use of the floating-point hardware capabilities of higher-end 80x86 compatible processors. Example #4 uses Ix86L-FP.
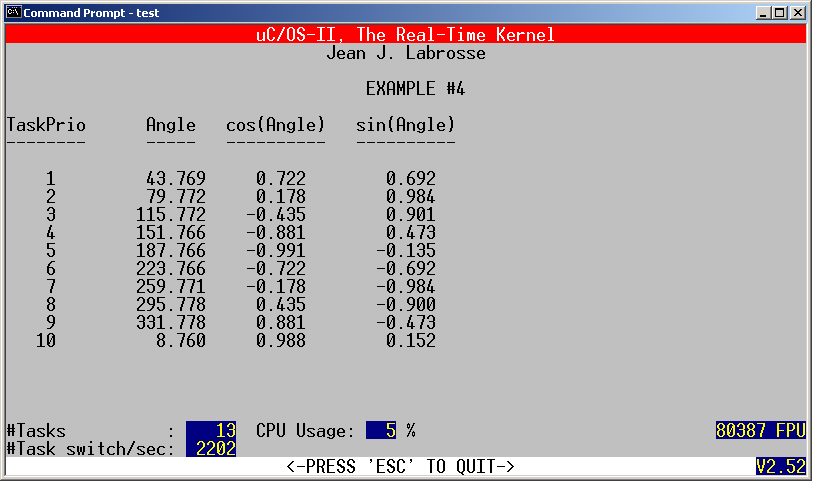
In this example, I created 10 identical tasks each running 200 times per second. Each task computes the sine and cosine of an angle (in degrees). The angle being computed by each task is offset by 36 degrees (360 degrees divided by 10 tasks) from each other. Every time the task executes, it increments the angle to compute by 0.01 degree.
The code for Example #4 is found in the \SOFTWARE\uCOS-II\EX4_x86L\BC45 directory. You can open a DOS window and type:
CD \SOFTWARE\uCOS-II\Ex4_x86L\BC45\TEST
As usual, to execute example #4, simply type TEST at the command line prompt. The DOS window will run the TEST.EXE program.
After about two seconds, you should see the screen shown in Figure 1.6. I let TEST.EXE run for a few seconds before I captured the screen shot.
Example #4 consists of 13 tasks as displayed in the lower left of Figure 1.6. Of those 13 tasks, µC/OS-II creates two internal tasks: the idle task and a task that determines CPU usage. Example #4 creates the other 11 tasks.
By now, you should be able to find you way around TEST.C. Example #4 doesn’t introduce too many new concepts. However, there are a few subtleties done behind the scene which I’ll describe after discussing a few items in TEST.C. Listing 1.21 shows the code to create the 10 identical applications tasks.
static  void  TaskStartCreateTasks (void)
{
    INT8U  i;
    INT8U  prio;


    for (i = 0; i < N_TASKS; i++) {
        prio        = i + 1;                                        (1)
        TaskData[i] = prio;                                         (2)
        OSTaskCreateExt(Task,
                        (void *)&TaskData[i],                       (3)
                        &TaskStk[i][TASK_STK_SIZE - 1],
                        prio,
                        0,
                        &TaskStk[i][0],
                        TASK_STK_SIZE,
                        (void *)0,
                        OS_TASK_OPT_SAVE_FP);                       (4)
    }
}
(1) Because µC/OS-II doesn’t allow multiple tasks at the same priority, I offset the priority of the identical tasks by 1 since task priority #0 is assigned to TaskStart().
(2) The task priority of each task is placed in an array.
(3) µC/OS-II allows you to pass an argument to a task when the task is first started. This argument is a pointer, and I generally call it pdata (pointer to data). The task priority saved in the array is actually passed as the task argument, pdata.
(4) Each of the tasks will be doing floating point calculations and we want to tell the port (see Chapter 15) to save the floating-point registers during a context switch.
Listing 1.22 shows the actual task code.
void  Task (void *pdata)
{
    FP32   x;
    FP32   y;
    FP32   angle;
    FP32   radians;
    char   s[81];
    INT8U  ypos;


    ypos  = *(INT8U *)pdata + 7;
    angle = (FP32)(*(INT8U *)pdata) * (FP32)36.0;                           (1)
    for (;;) {
        radians = (FP32)2.0 * (FP32)3.141592 * angle / (FP32)360.0;         (2)
        x       = cos(radians);
        y       = sin(radians);
        sprintf(s, "   %2d       %8.3f  %8.3f     %8.3f",
                *(INT8U *)pdata, angle, x, y);
        PC_DispStr(0, ypos, s, DISP_FGND_BLACK + DISP_BGND_LIGHT_GRAY);
        if (angle >= (FP32)360.0) {
            angle  =   (FP32)0.0;
        } else {
            angle +=   (FP32)0.01;
        }
        OSTimeDly(1);                                                       (3)
    }
}
(1) The argument pdata points to an 8-bit integer containing the task priority. To make each task calculate different angles (not that it really matters), I decided to offset each task by 36 degrees.
(2) sin() and cos() assumes radians instead of degrees and thus the conversion.
(3) Each task is delayed by 1 clock tick (i.e. 50 milliseconds) and thus, each task will execute 200 times per second.
Except for specifying OS_TASK_OPT_SAVE_FP in TaskStartCreateTasks(), you could not tell that from TEST.C that we are using a different port from the other examples. In fact, it may be a good idea to always specify the option OS_TASK_OPT_SAVE_FP when you create a task (using OSTaskCreateExt()) and, if the port supports floating-point hardware, µC/OS-II will take the necessary steps to save and retrieve the floating-point registers during a context switch. That’s in fact one of the beauties of µC/OS-II: portability of your applications across different processors.
In order to use a different port (at least for the 80x86), you only need to change the following files:
INCLUDES.H (in the SOURCE directory):
Instead of including:
\software\ucos-ii\ix86l\bc45\os_cpu.h
you simply need to ‘point’ to a different directory:
\software\ucos-ii\ix86l-fp\bc45\os_cpu.h
TEST.LNK (in the SOURCE directory):
The linker command file includes the floating-point emulation library in the non-floating-point version:
C:\BC45\LIB\EMU.LIB
and the hardware floating-point library needs to be referenced for the code that makes use of the FPU:
C:\BC45\LIB\FP87.LIB
TEST.MAK (in the TEST directory):
The directory of the port is changed from:
PORT=\SOFTWARE\uCOS-II\Ix86L\BC45
to:
PORT=\SOFTWARE\uCOS-II\Ix86L-FP\BC45
The compiler flags in the macro C_FLAGS includes –f287 for the floating-point version of the code, and omits it in the non-floating-point version.